How do I integrate Autotask with Partner Center?
The Autotask integration in Partner Center syncs company and contact records between your Datto Autotask PSA account and the Vendasta CRM in both directions. You set up an API user and security level in Autotask, then connect it from Administration → Integrations.
When a record changes in Autotask, it appears in Vendasta within seconds, and changes in Vendasta can sync back to Autotask. You don't need Zapier or manual data entry to keep the two systems aligned.
This integration keeps your customer data aligned across both platforms so your team always works with current information.
Who can use the Autotask integration?
Both Partners and their SMB clients. Partners manage the connection in Partner Center, while SMBs benefit from synced data inside Business App.
What gets synced?
| Data | Autotask to Platform | Platform to Autotask |
|---|---|---|
| Companies (clients) | Auto-synced | Auto-synced (when enabled) |
| Contacts | Auto-synced | Auto-synced (when enabled) |
What Autotask permissions do I need before I begin?
Before connecting, your Autotask account must be set up with the correct permissions. Without these, the connection may not work, and sync will fail silently.
You will need:
- An active Vendasta account
- An Autotask PSA account
- Your Autotask API user's User Name and Secret (API key)
In Autotask, go to Admin → Resources (Human Resources) → API User. Create a dedicated API-only user, selecting AMP - Automated Marketing Platform as the integration vendor during creation.
Step 1 — Create a Security Level in Autotask
Creating a dedicated security level gives the integration a clean, controlled permission set.
- Sign in to Autotask.
- Go to
Admin→Account Settings and Users→Security→Security Levels. - Click Create New and choose Clone an existing security level.
- Select Api User (System) as the template.
- Name it Vendasta API Access.
- Save.
Step 2 — Enable webhooks on the Security Level
Webhooks allow Autotask to notify Vendasta about changes in real time.
- Open the security level you created (Vendasta API Access).
- Go to the Other Settings tab.
- Find the Webhooks section.
- Set webhooks to Enabled.
- Set the maximum number of webhooks to at least 5 (the integration creates webhooks for Company and Contact events — create, update, and delete).
- Save.
If webhooks are not enabled, the connection will appear as "Connected" in Vendasta, but changes in Autotask will not be synced back to Vendasta. This is the most common cause of "sync not working" reports.
Step 3 — Enable Company and Contact permissions
- In the same security level, go to the Companies tab.
- Enable Read and Write access.
- Go to the Contacts tab.
- Enable Read and Write access.
- Save.
Step 4 — Create an API User
The integration connects with a dedicated API user, not a personal login.
- In Autotask, go to
Admin→Resources (Human Resources)→API User. - Click Create New.
- Fill in basic details like Name, Email.
- Go to the Security tab. Assign the Vendasta API Access security level (created in Step 1).
- In the
API Tracking Identifiersection, chooseIntegration Vendor, then selectAMP - Automated Marketing Platform. - Save the user.
- Record the Username and Secret — you will need these in the next section.
Store the API username and secret in your organization's approved password manager. Do not share them in email or chat.
Do you already have records in Vendasta?
Before connecting, answer this question: Do you already have companies and contacts in Vendasta CRM that also exist in Autotask?
| Your situation | What to do |
|---|---|
| No existing records in Vendasta | Use CRM Bulk Import to bring your existing Autotask companies and contacts into Vendasta, then connect. The integration handles real-time sync from that point forward. |
| Yes — records exist in both systems | You must import Autotask IDs first to prevent duplicates. Follow the Bulk Import section below BEFORE connecting. |
| Already connected and seeing duplicates | Follow the Recovery section at the bottom of this page. |
How do I prevent duplicate records with a bulk import?
If your Vendasta CRM already has companies and contacts that also exist in Autotask, you must link them with Autotask IDs before connecting. Without this, the sync creates duplicate records as records change in Autotask.
Do this BEFORE connecting Autotask. Order matters — import companies first, then contacts.
Step 1 — Get your Autotask IDs
In Autotask, open each company or contact. The ID is visible in the URL bar or in the record detail panel.
Step 2 — Prepare your company CSV
Create a CSV file with the columns below. The external_id column is critical — it links the Vendasta record to the Autotask record.
The format must be exactly autotask:{id} with no spaces.
| Company Name | Company Website | Phone number | Street address line 1 | City/locality | State/province/region | Zip/postal code | Country | External ID |
|---|---|---|---|---|---|---|---|---|
| Marqt Administratie | www.example.com | 85657687 | 1032 8th Street East | Saskatoon | SK | S7H 0S2 | CA | autotask:30684201 |
| Albany Apple Store | www.albanyapple.com | 55501234 | 123 Main St | Albany | NY | 12207 | US | autotask:29683562 |
Step 3 — Prepare your contacts CSV
Create a CSV file for contacts following the same format, with autotask:{id} as the external_id.
| First name | Last name | Phone number | Street address line 1 | City/locality | State/province/region | Zip/postal code | Country | External ID | |
|---|---|---|---|---|---|---|---|---|---|
| Jane | Smith | 5550100 | jane.smith@example.com | 1032 8th Street East | Saskatoon | SK | S7H 0S2 | CA | autotask:30684161 |
| Sneha | Iyer | 4353 4545 | sneha.iyer@example.com | 1 Grand Southern Trunk Road | Chennai | Tamil Nadu | 600016 | India | autotask:30686245 |
Step 4 — Import companies first
- Go to
Partner Center→CRM→Companies→Import.
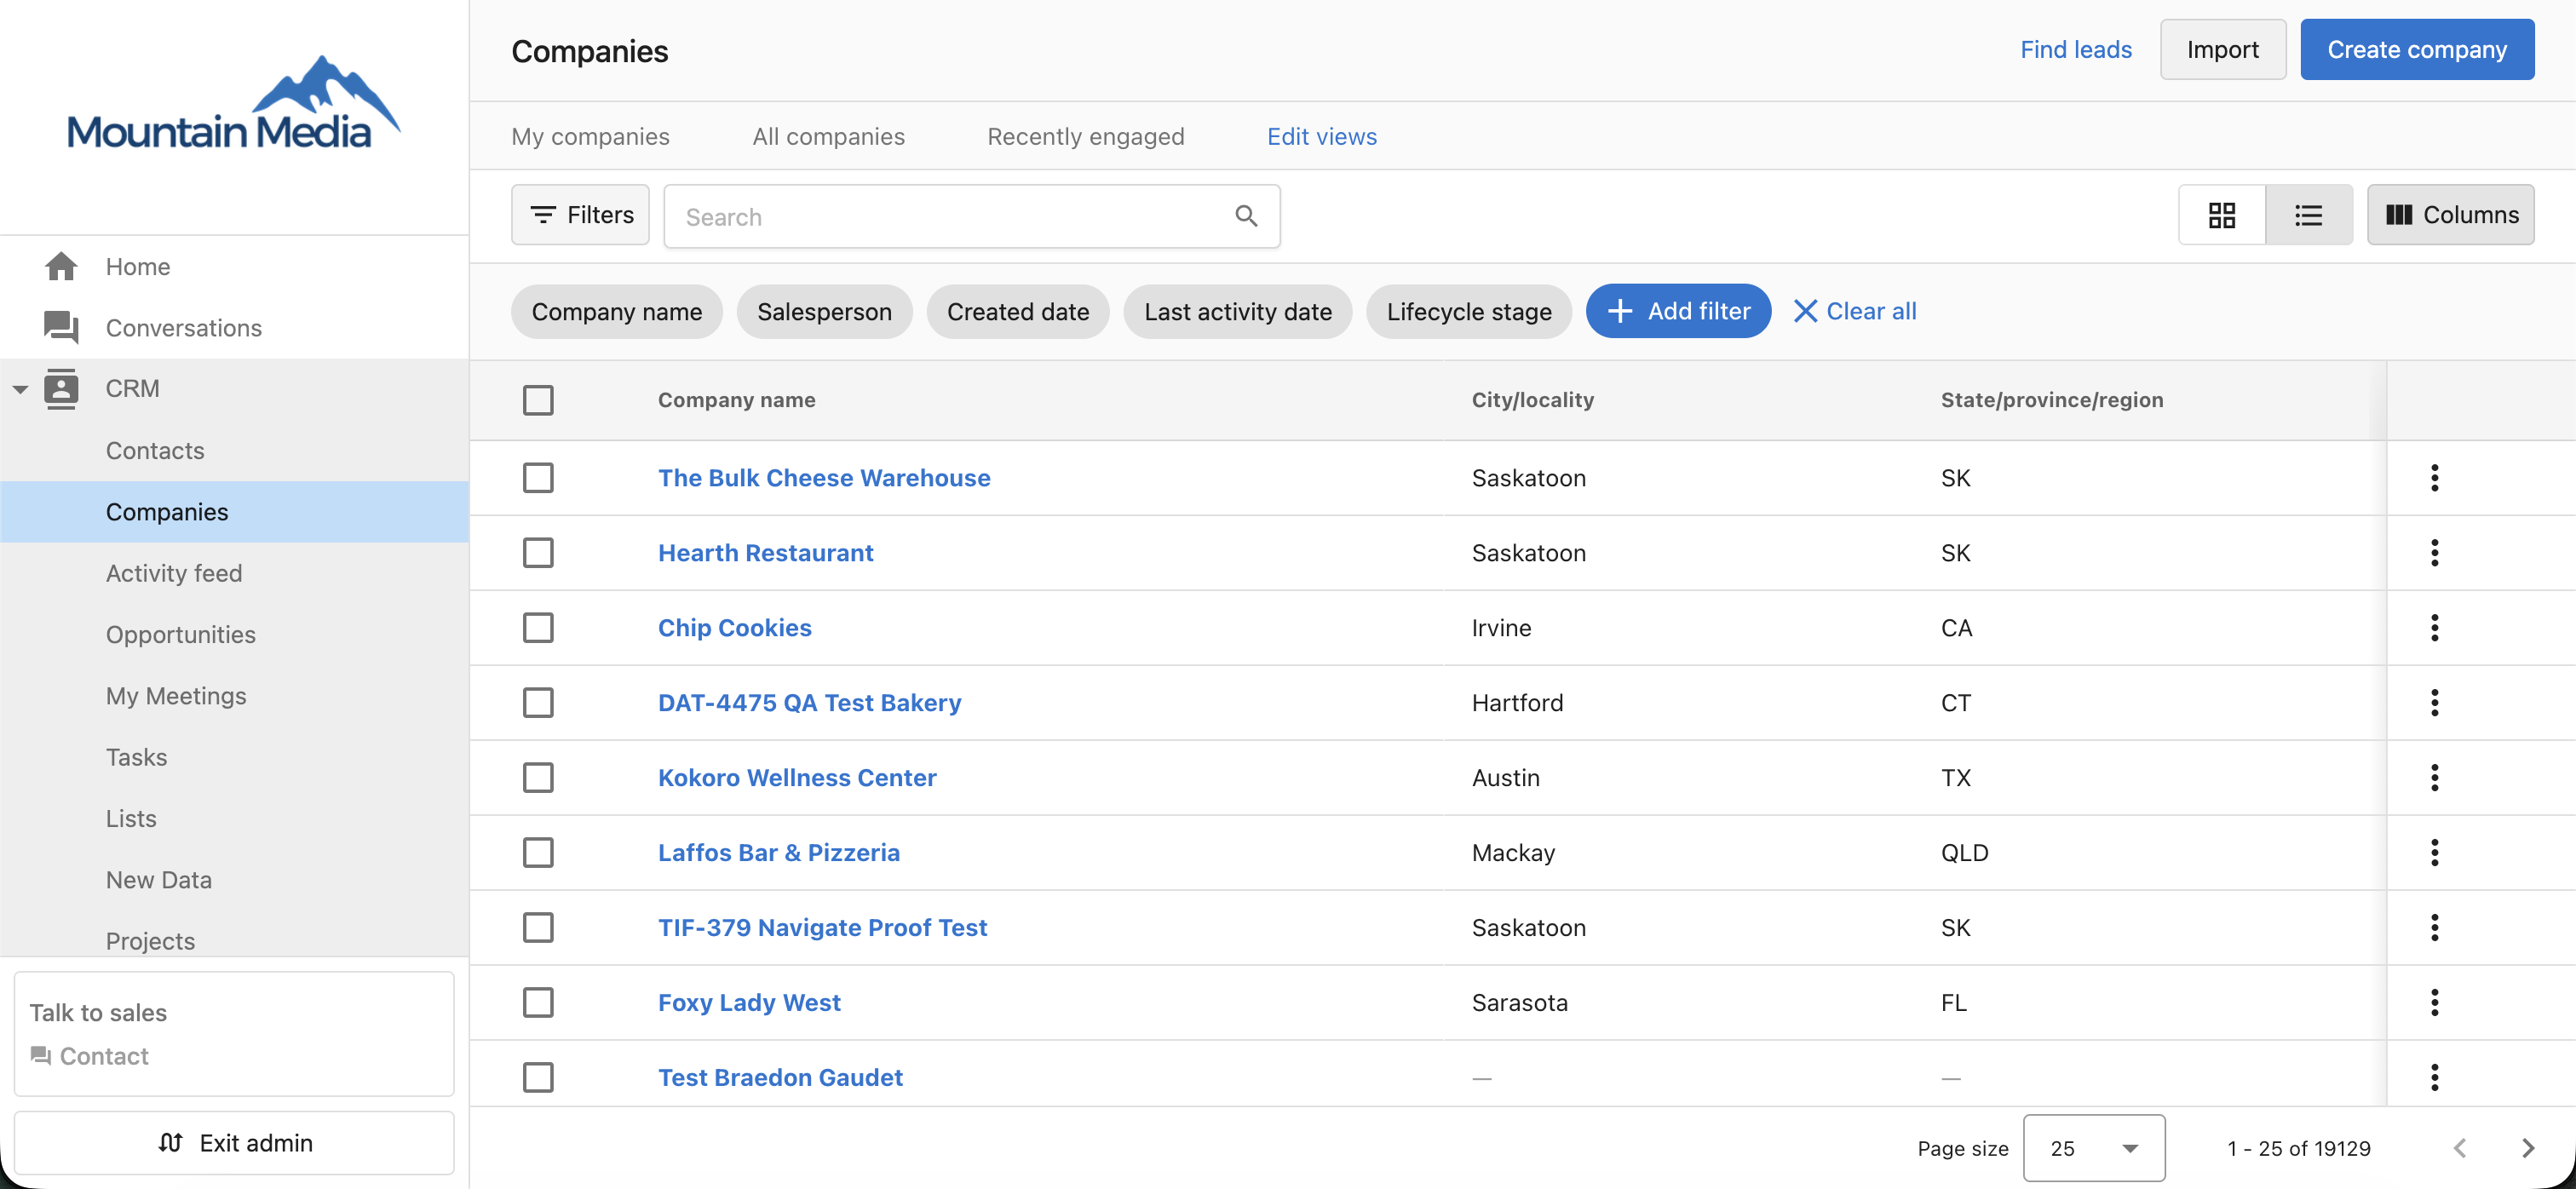
- Upload your company CSV.
- On the mapping screen, make sure the external_id column is mapped to the External ID field.
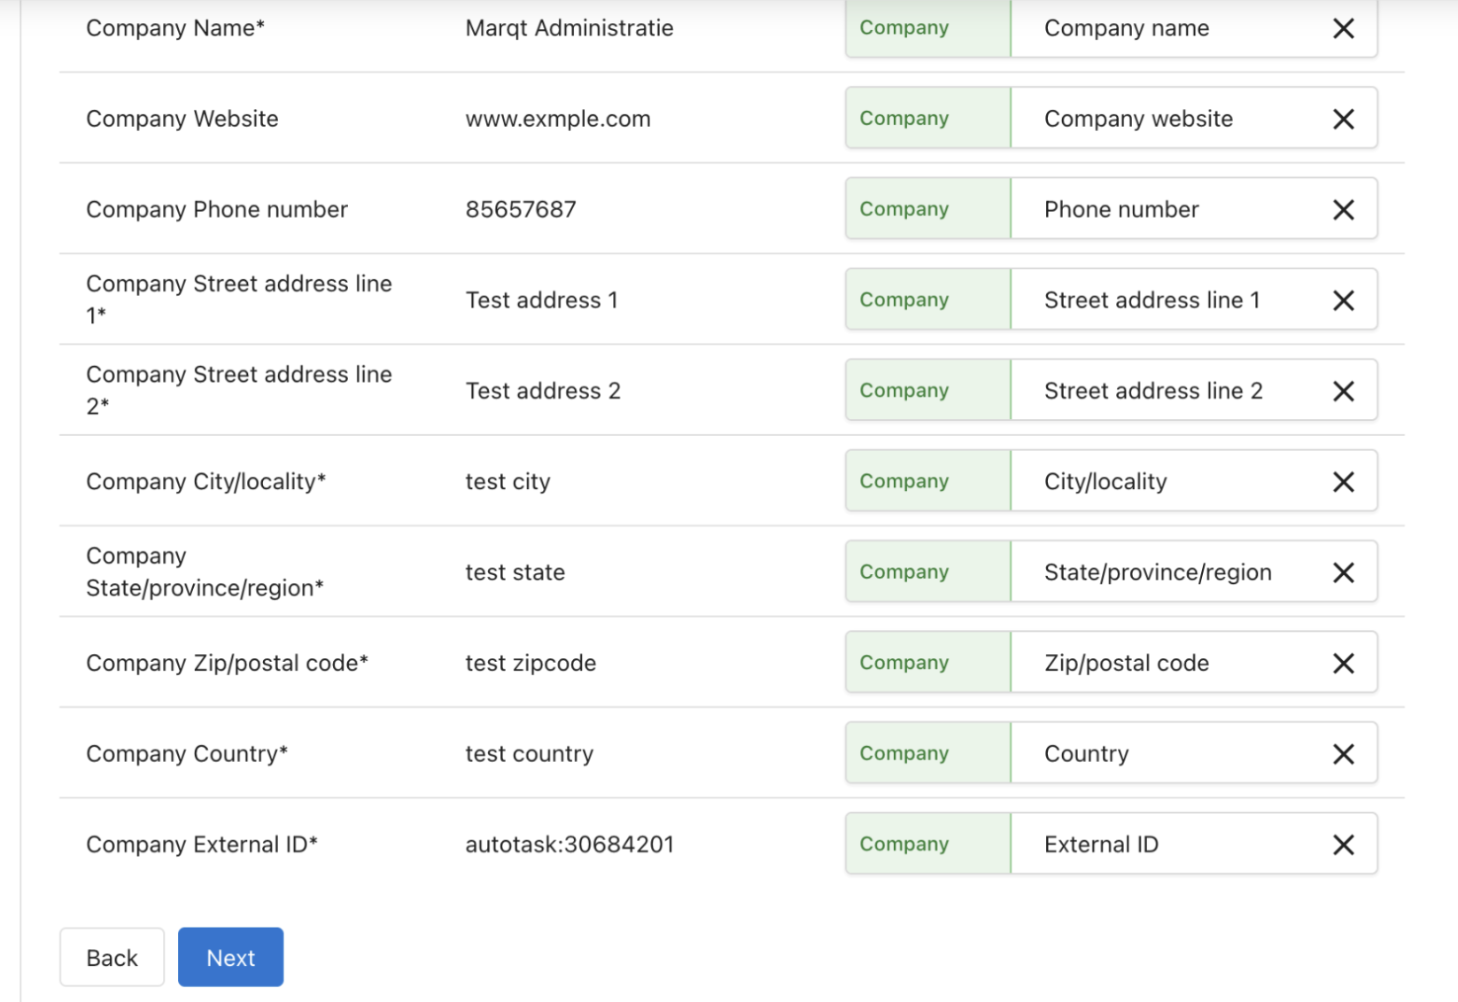
- Complete the import.
Step 5 — Import contacts
- Go to
CRM→Contacts→Import.
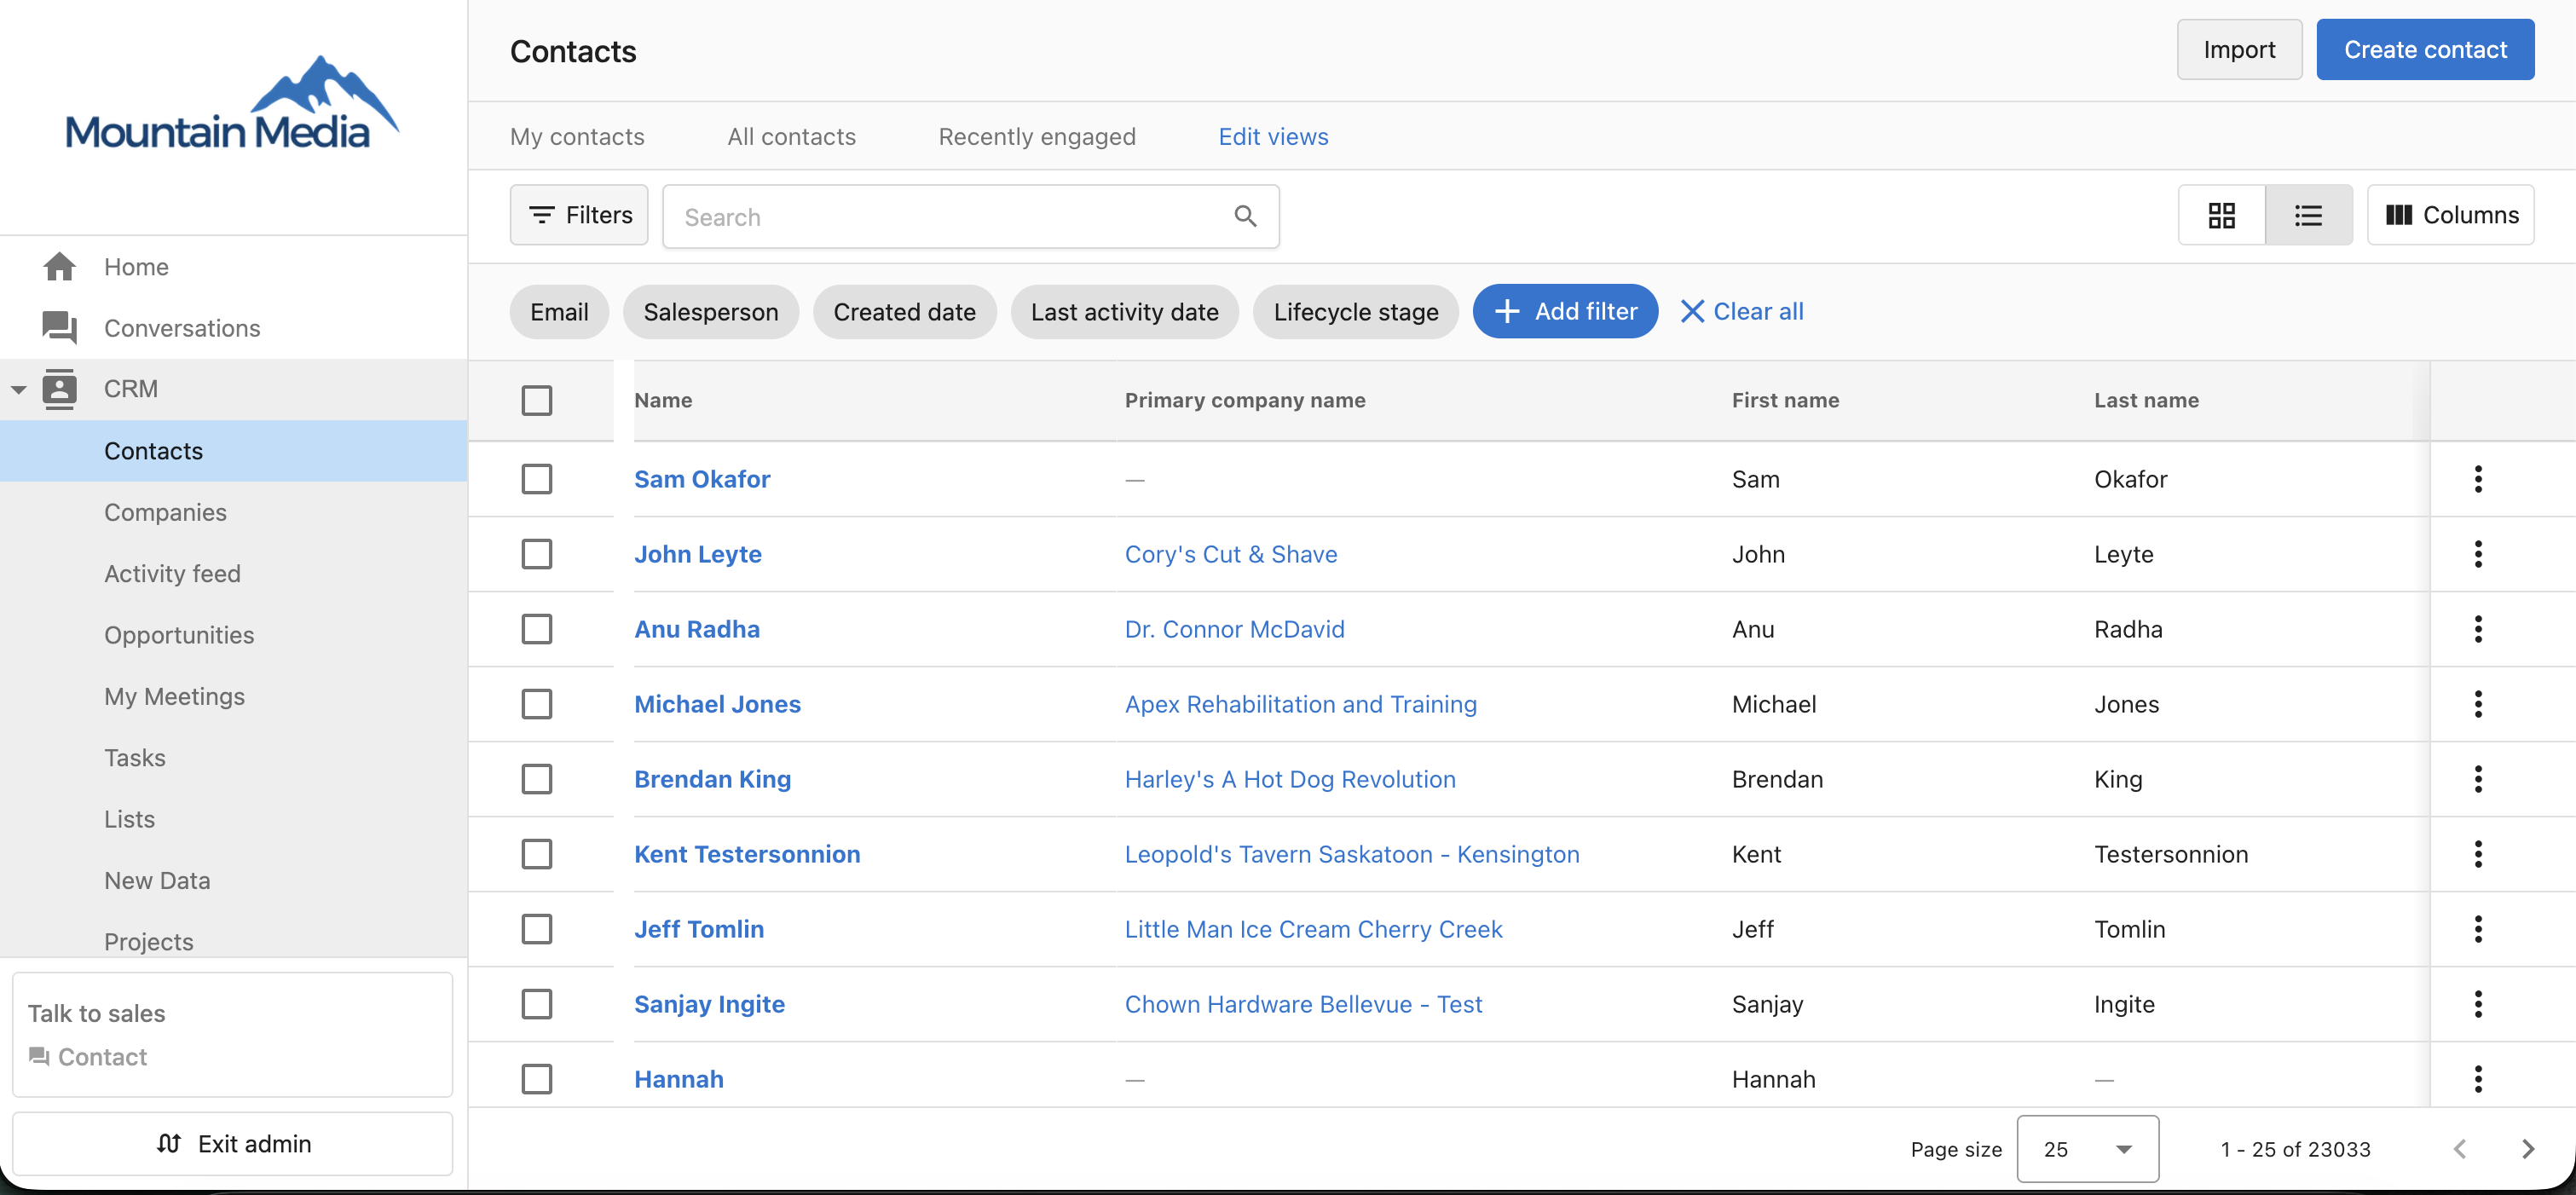
- Upload your contacts CSV.
- Map the fields — contacts will be associated with companies by company name.
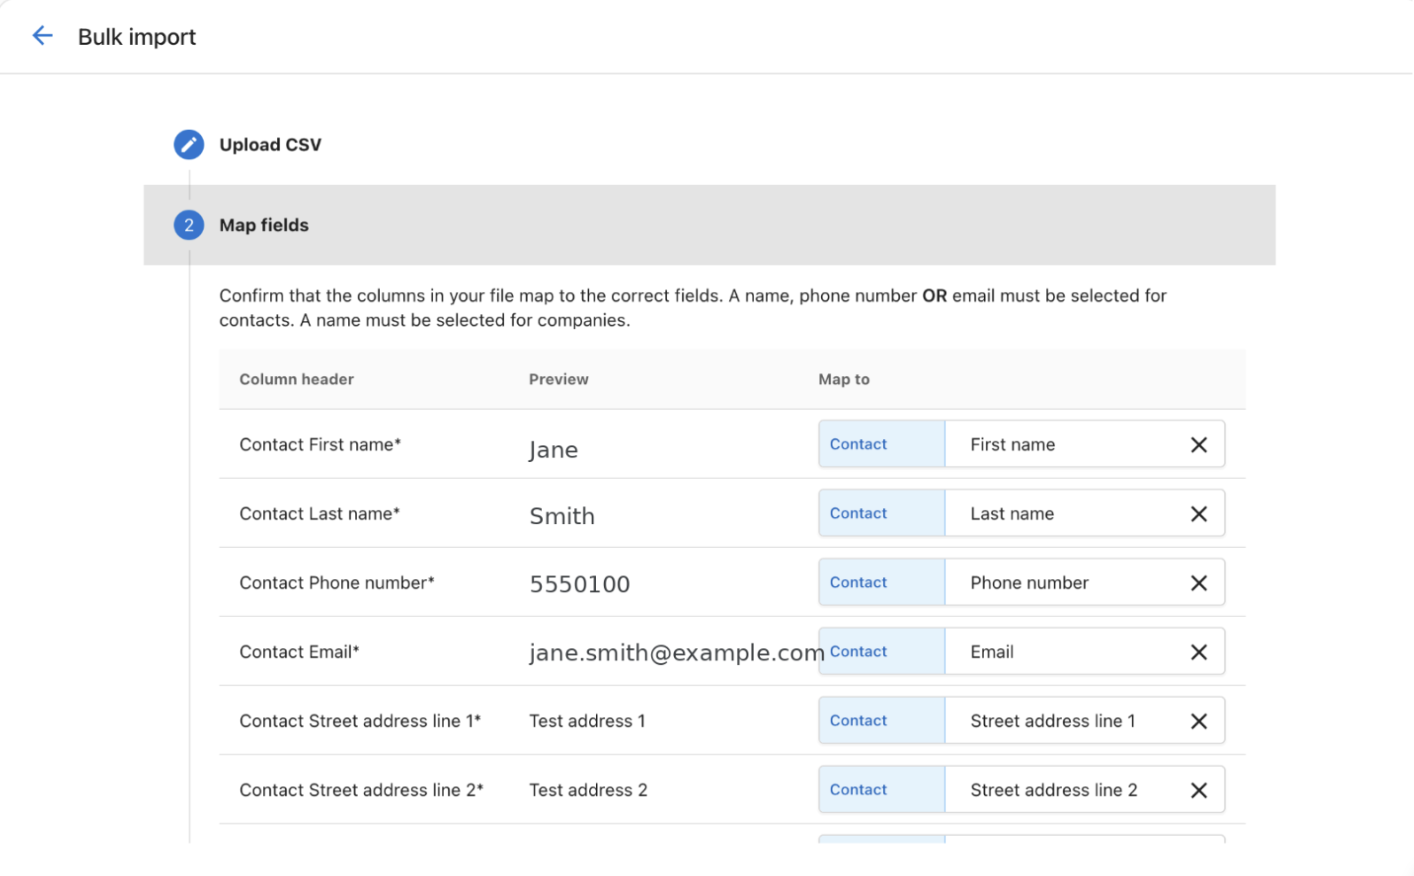
- Complete the import.
Step 6 — Verify
Open a few records in Vendasta CRM. Confirm the external_id field is populated with the autotask:{id} value.
Step 7 — Now, connect Autotask
Proceed to the next section. When the sync runs, it matches records by external_id — no duplicates.
If you skip this step and connect first, the sync will create duplicate records for every company and contact. See the Recovery section at the bottom of this page if this has already happened.
How do I set up the Autotask integration?
With your Autotask permissions configured and bulk import complete (if needed), you are ready to connect.
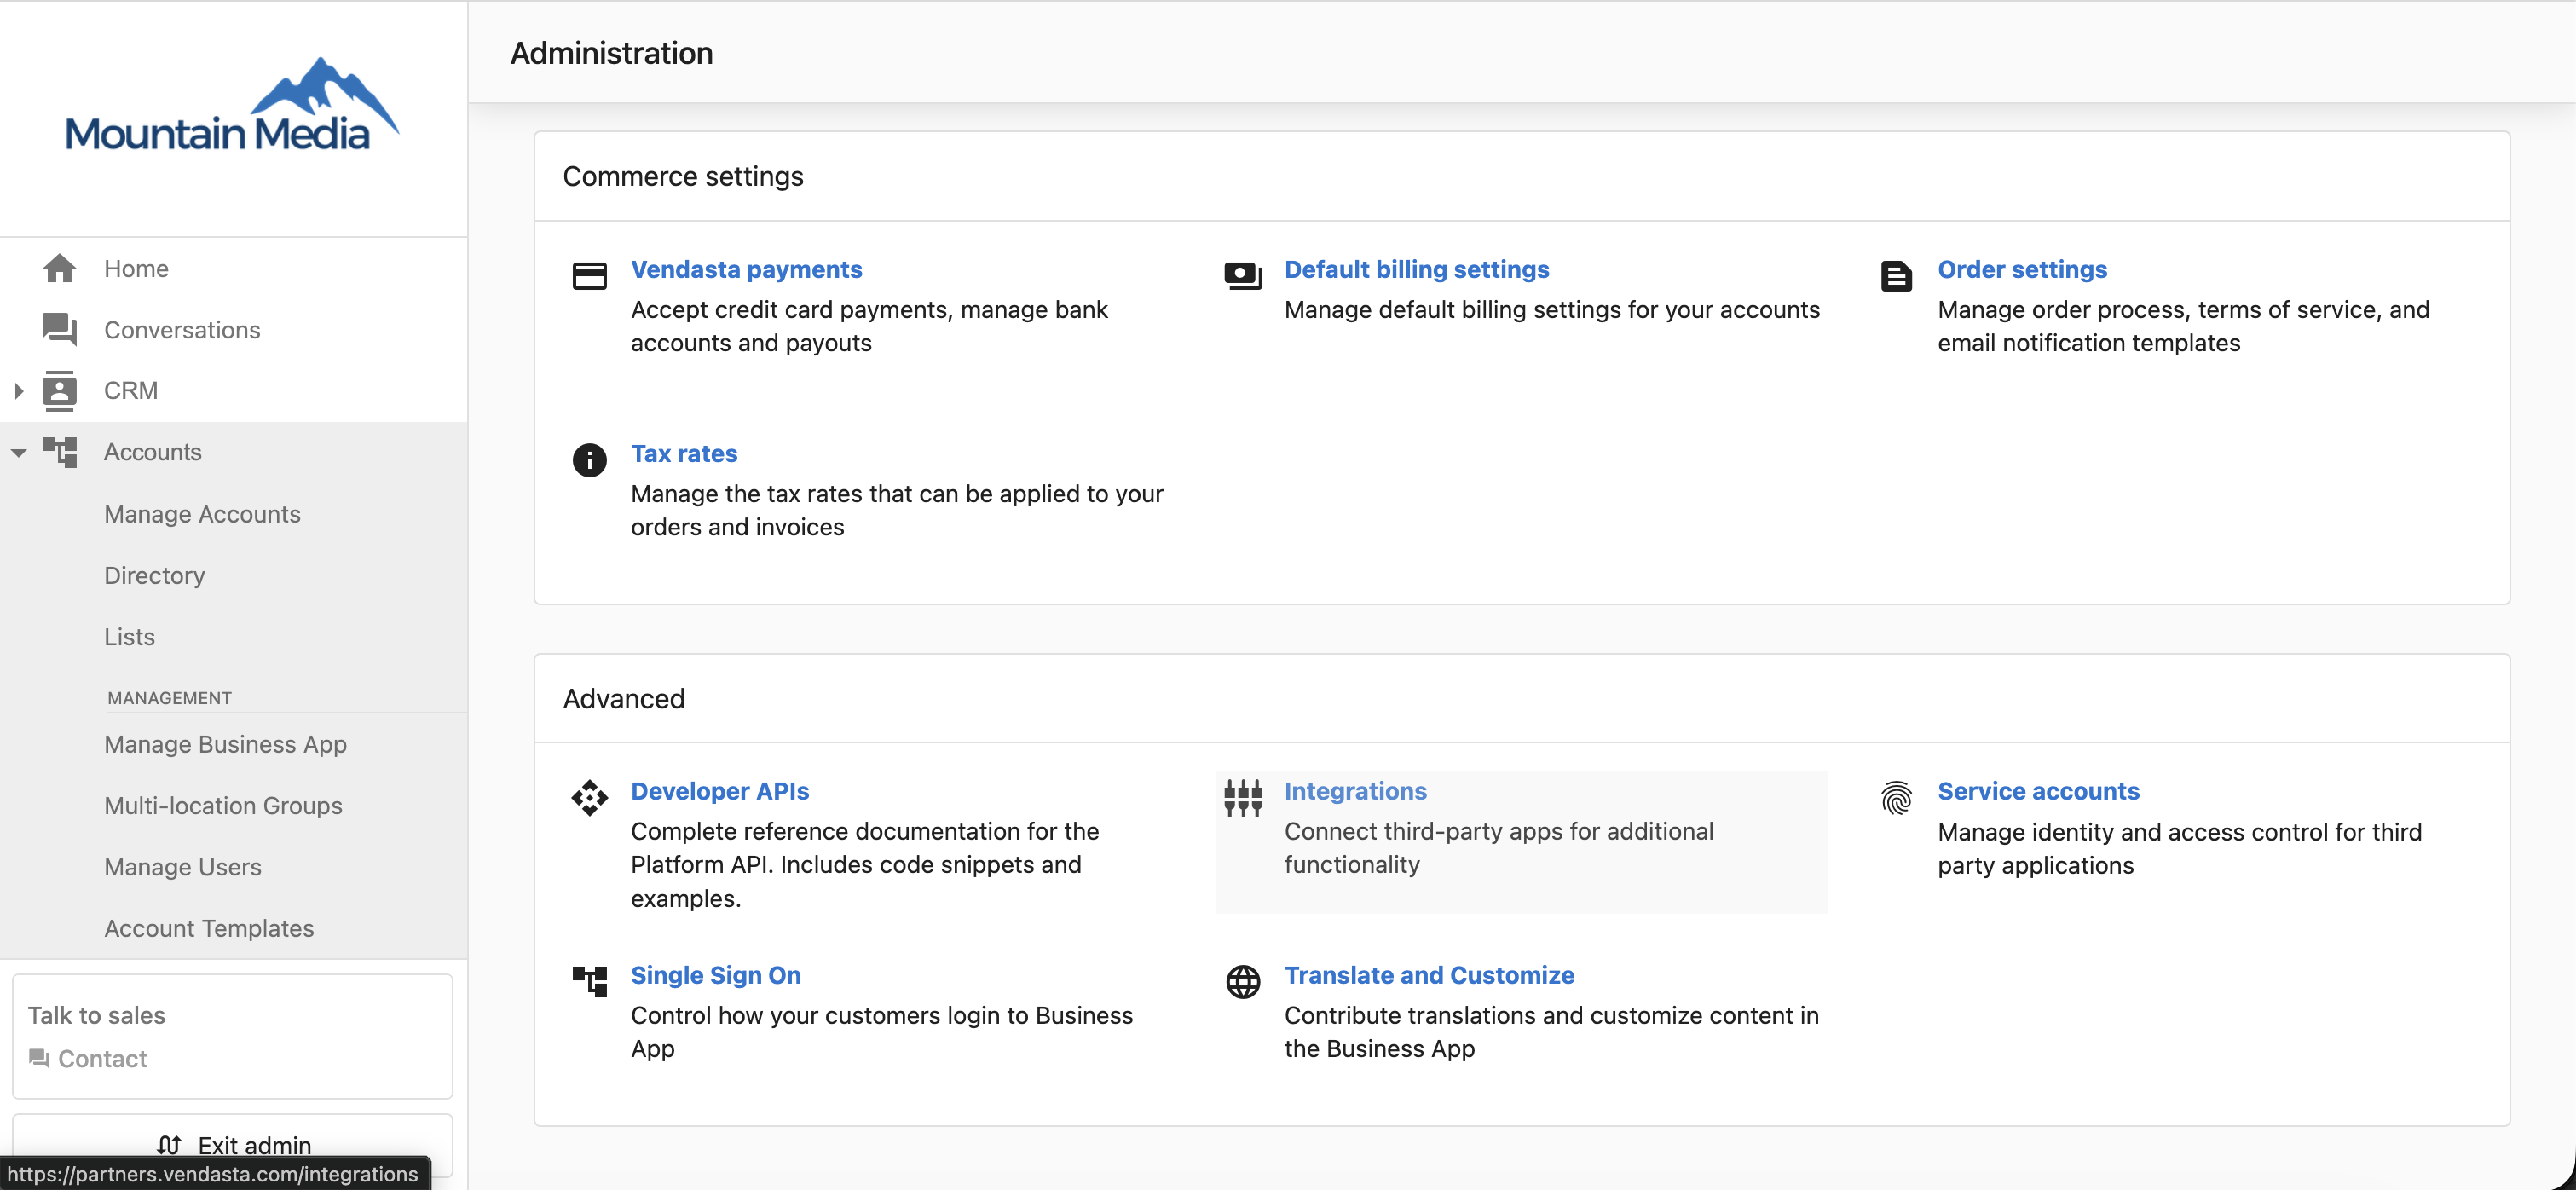
Step 1 — Open Integrations
From Partner Center, click Administration → Integrations. You can also access this from Marketplace → Integrations.
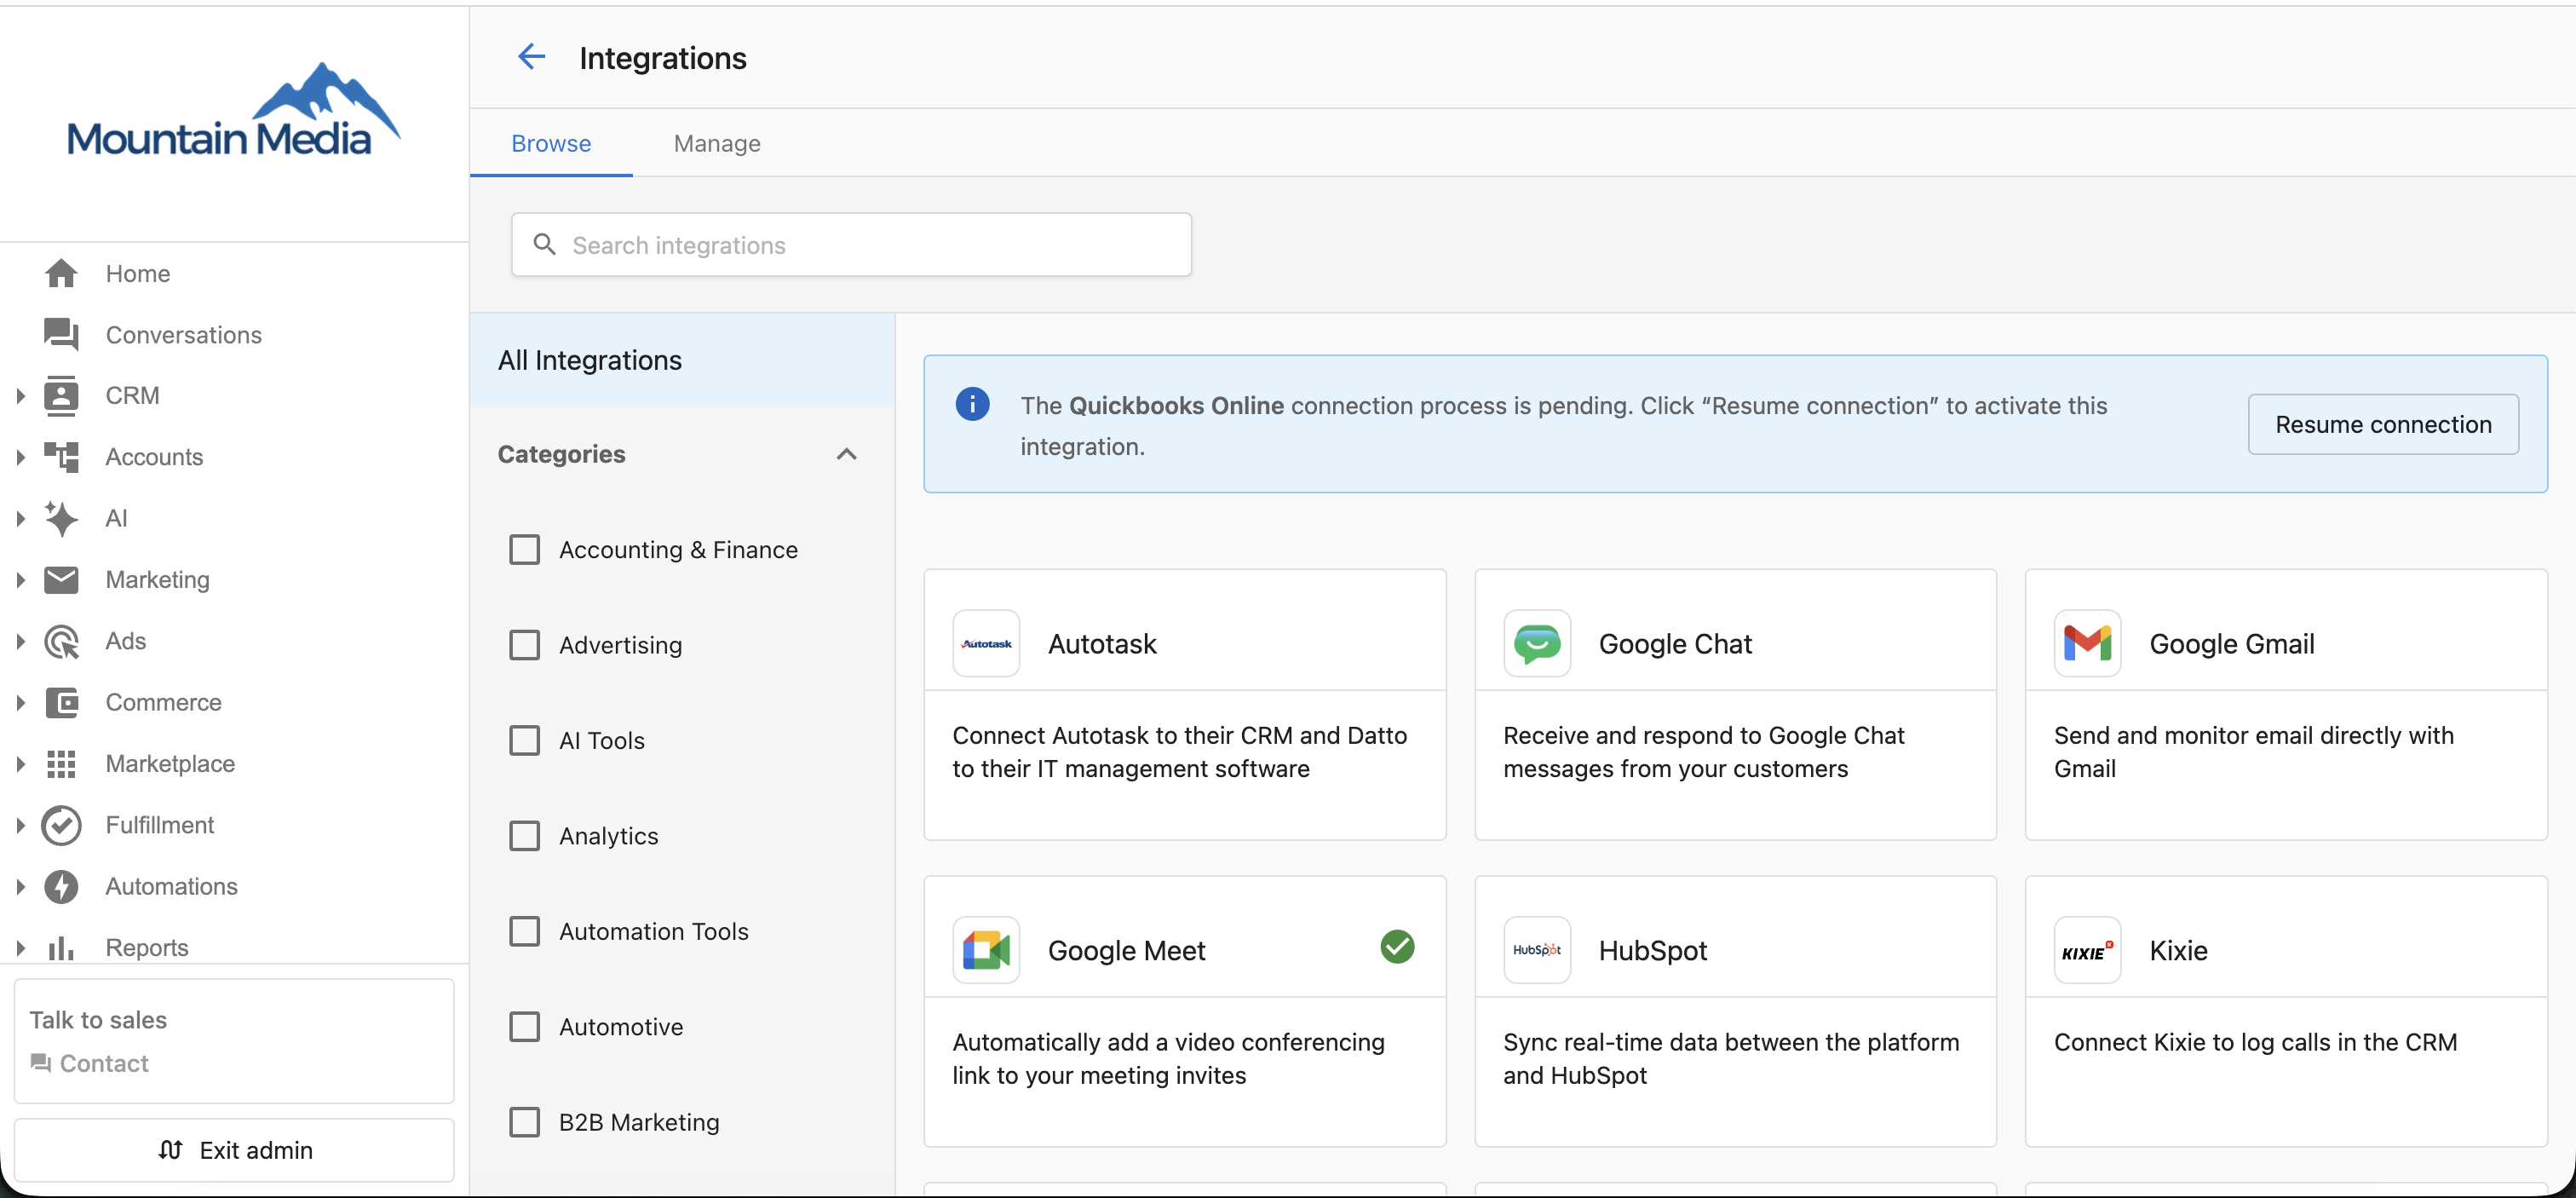
Step 2 — Find the Autotask card
On the Integrations page, locate the Autotask card. Click Connect.
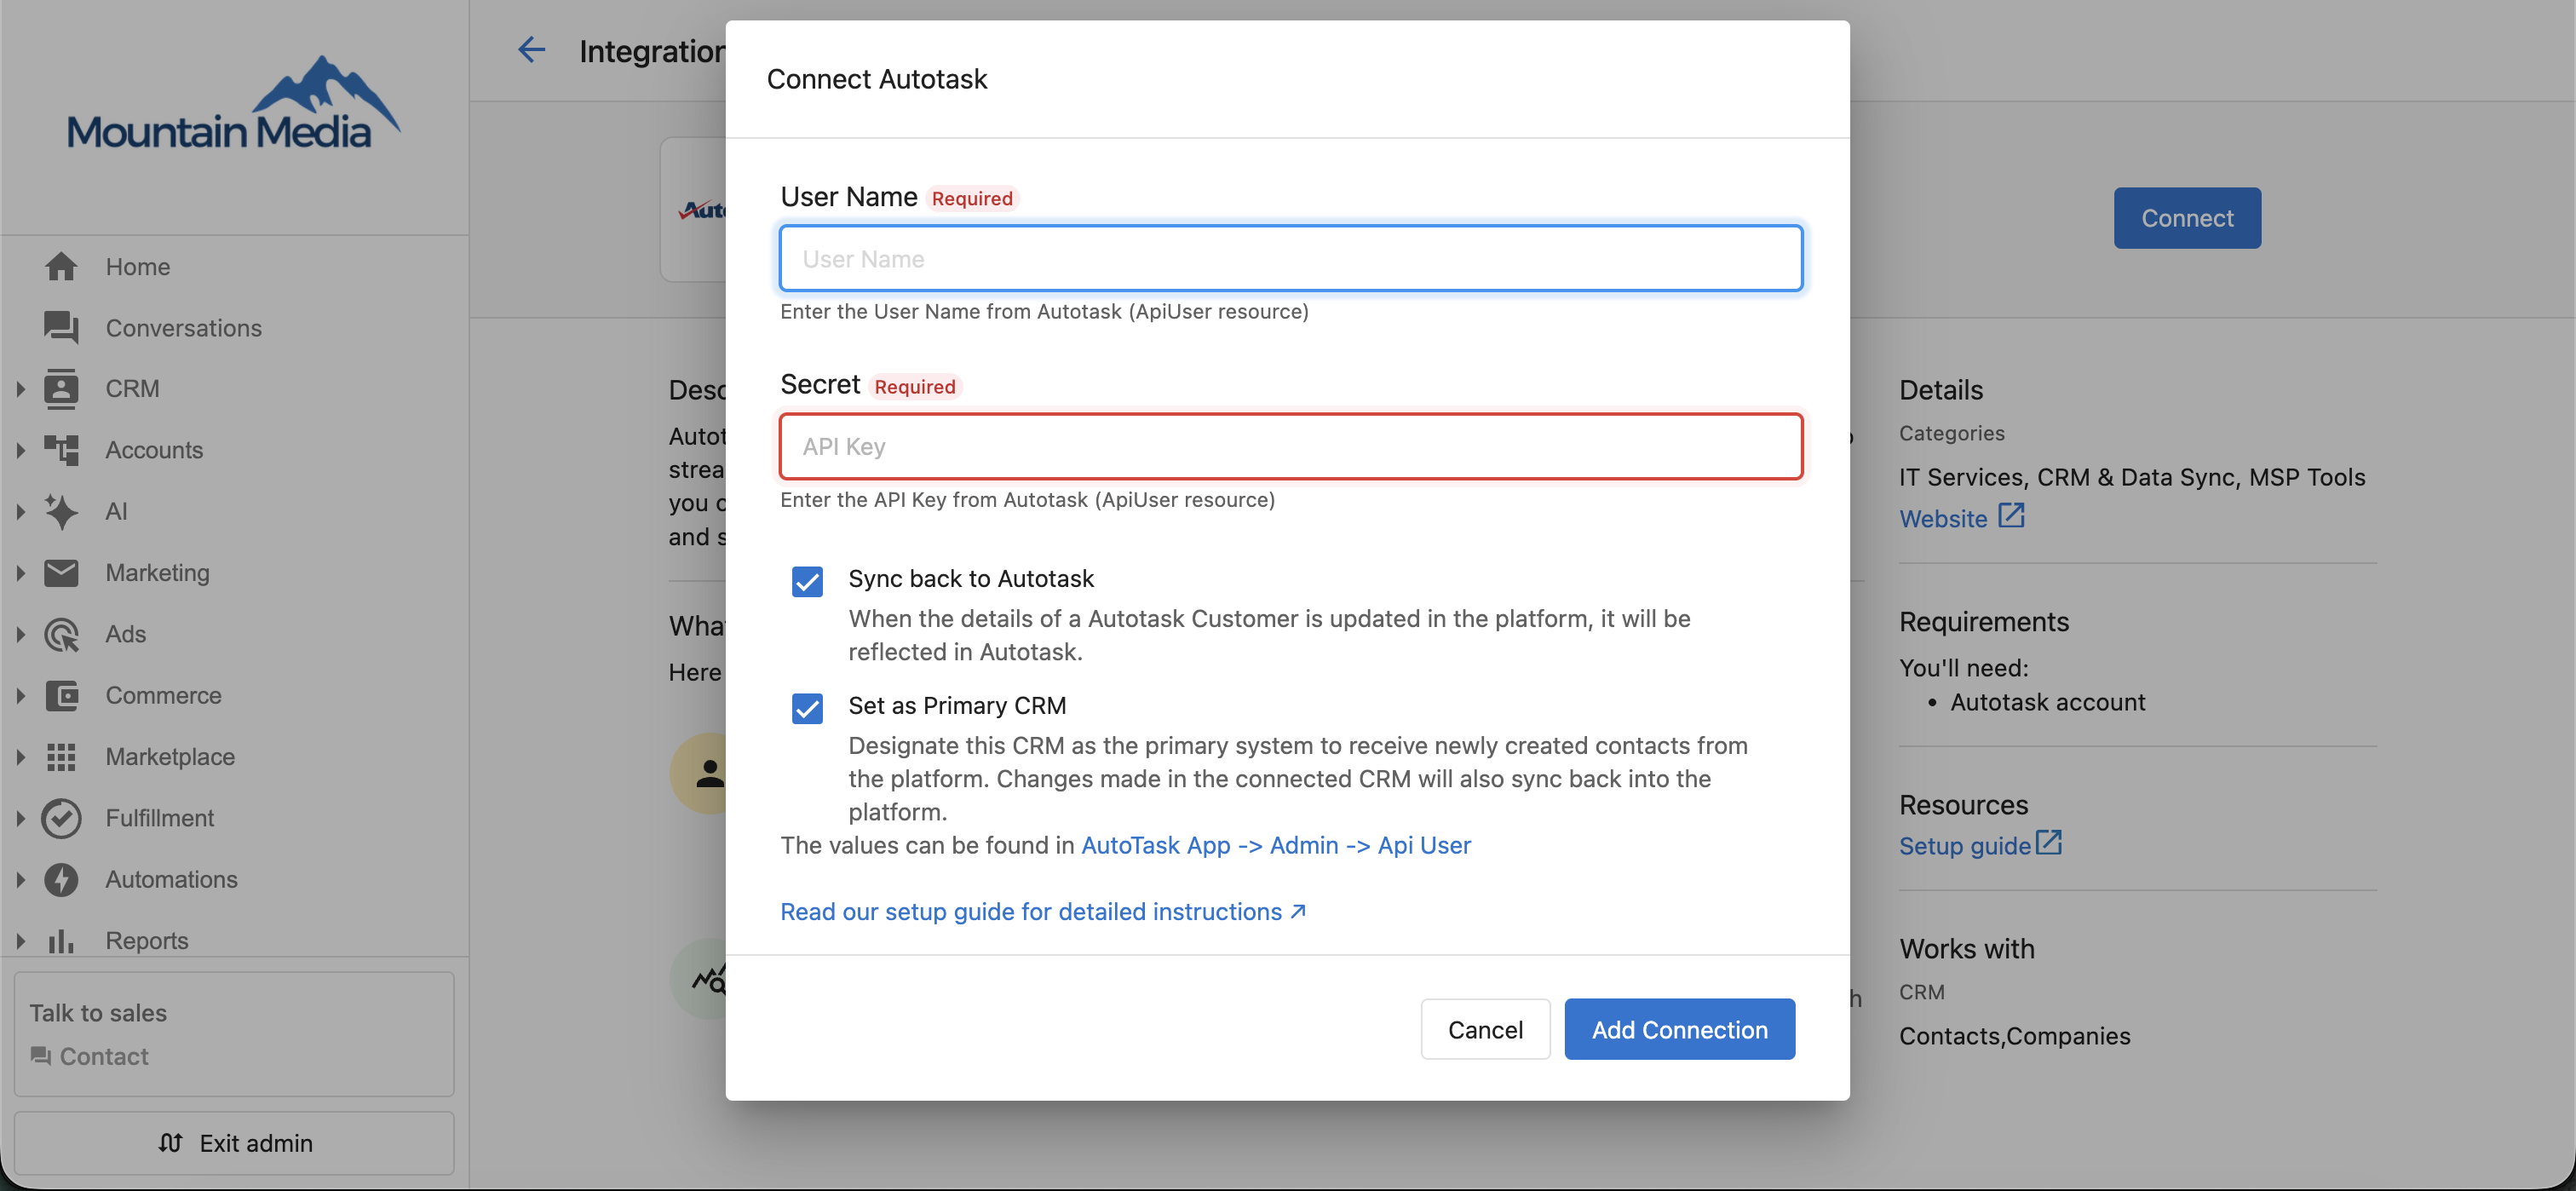
Step 3 — Enter your credentials and choose sync settings
The Connect Autotask dialog appears. Both credential fields are required:
| Field | What to enter | Where to find it |
|---|---|---|
| User Name | The username of your Autotask API user | Autotask → Admin → API User (the ApiUser resource) |
| Secret | The API key associated with that user | Same location — generated when the API user was created |
The same dialog also contains two sync checkboxes. Both are selected by default — set them before you connect:
| Setting | What it does | Recommended |
|---|---|---|
| Sync back to Autotask | When an Autotask customer's details are updated in Vendasta, the change is reflected in Autotask | Leave selected for two-way sync |
| Set as Primary CRM | Designates Autotask as the primary system to receive newly created contacts from the platform. Changes made in Autotask also sync back into the platform | Leave selected if Autotask is your main system |
Click Add Connection.
If you see a 500 error at this step, your credentials are incorrect, or your API user is disabled. Go back to Autotask Admin and verify the username, secret, and that the user is active. Do not retry with the same credentials — it will fail again.
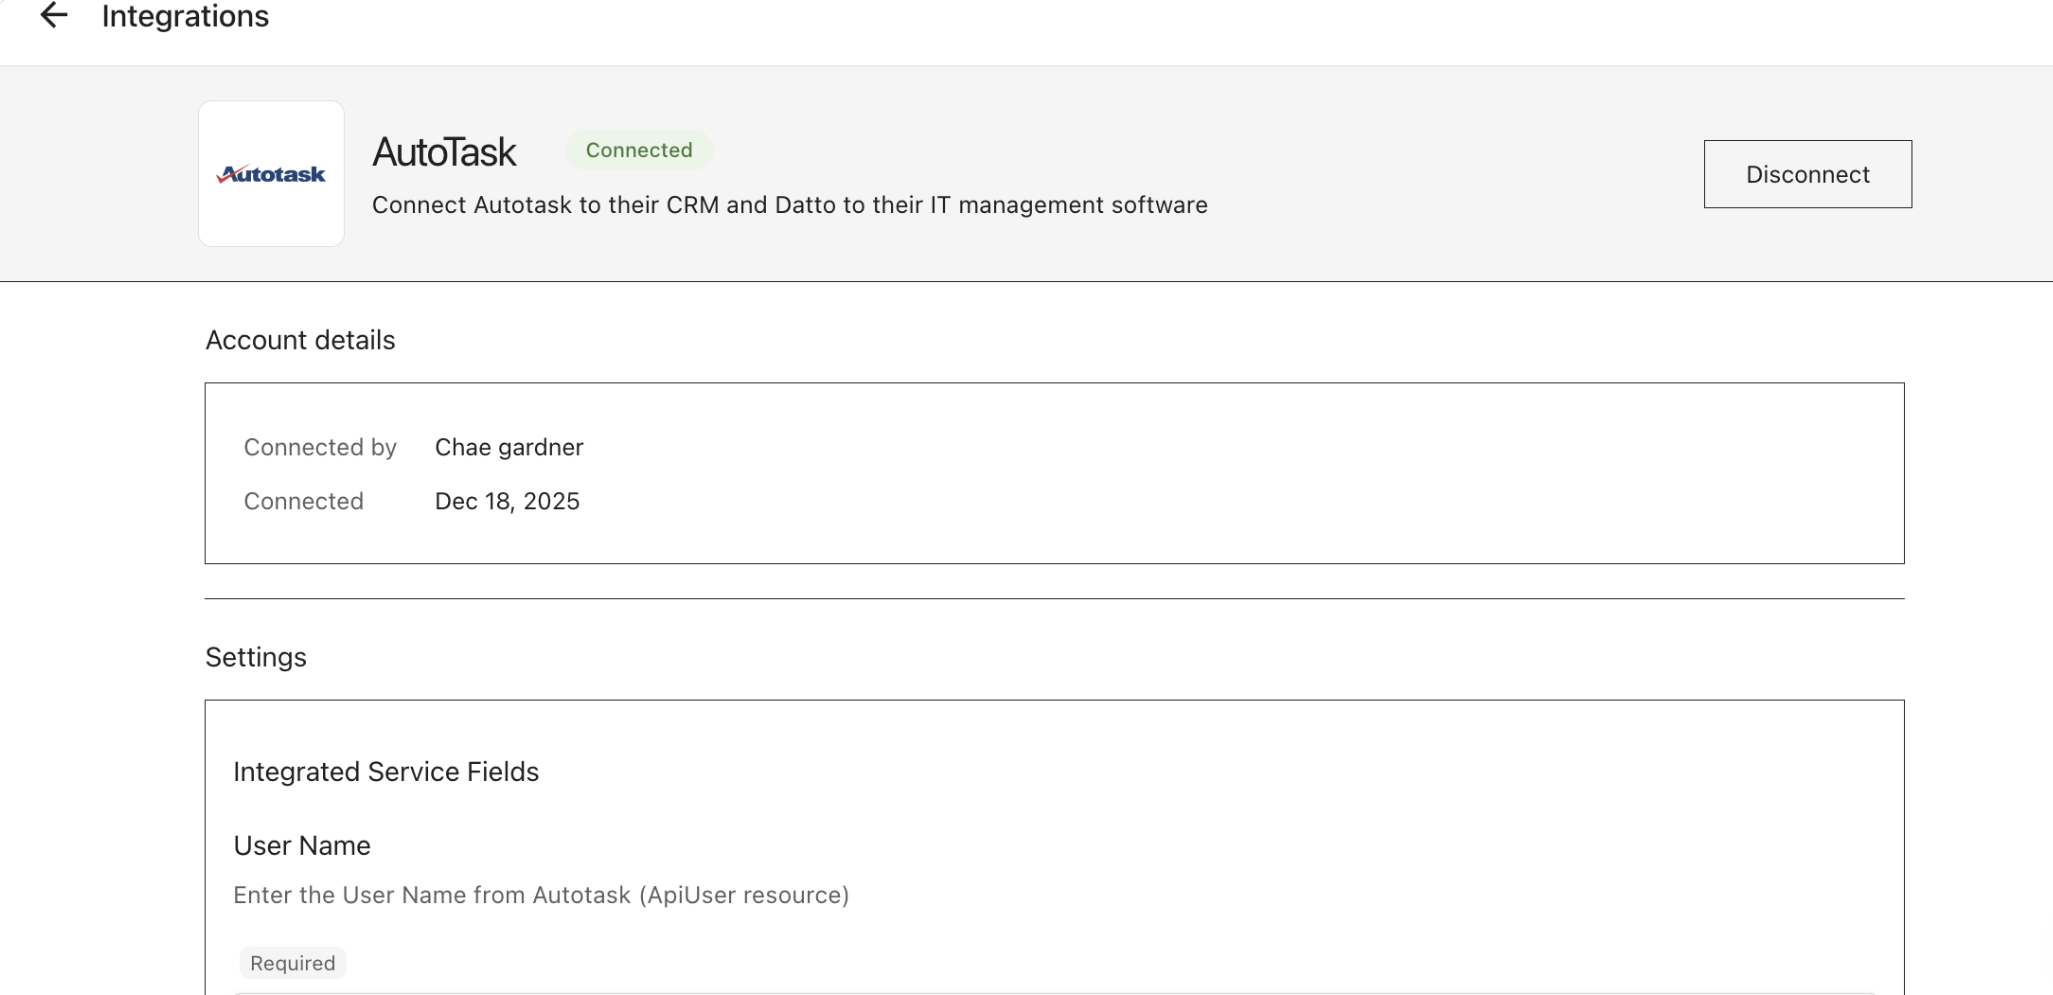
Step 4 — Connection confirmed
If your credentials are valid, the Autotask page shows a green Connected badge, along with Account details listing who connected the integration and when. A Disconnect button replaces Connect.
Step 5 — Review or change your settings
Your credentials and sync settings stay editable after connecting. On the Autotask page, scroll to Settings → Integrated Service Fields to update the User Name or Secret, or to change the Sync back to Autotask and Set as Primary CRM options you chose in Step 3.
Refresh the page to confirm your changes saved.
Step 6 — Real-time sync
Companies and contacts from Autotask sync into Vendasta automatically whenever changes are made at the company or contact level on the Autotask side. This runs in the background — you do not need to stay on the page. Companies sync first, then contacts.
Step 7 — Verify the sync
- Open
CRM→Companiesin Partner Center. - Look for a company that exists in Autotask.
- Confirm it appears with the correct name, phone, email, and address.
- Open a contact under that company — confirm it is linked correctly.
Done. Your Autotask integration is live. Changes sync in real time from this point forward.
How do I manage synced data?
The integration syncs the following data types:
- Companies — business name, phone, email, address, website (bidirectional)
- Contacts — first name, last name, phone, email, address, company association (bidirectional)
- Activity Feed notes — every sync event is logged on the record so you know what changed, when, and where it came from
- Safe deletes — deleting a record in one system does NOT delete it in the other. An activity note is logged instead.
To manage what syncs, go to Settings on your Autotask connection page:
- Sync back to Autotask selected — changes in Vendasta push to Autotask
- Sync back to Autotask cleared — changes only flow from Autotask to Vendasta (one-way)
One-way vs. two-way sync
| Mode | Recommended when | What to expect |
|---|---|---|
| One-way sync | Autotask is your primary source of truth and you want changes to flow into Vendasta only. | Updates made in Autotask sync into Vendasta. Changes made only in Vendasta do not write back to Autotask. |
| Two-way sync | Your team actively works in both systems and wants updates to stay aligned. | Changes move in both directions. Agree ahead of time on who owns data quality and where edits normally happen, to avoid conflicting updates. |
What does the sync look like in practice?
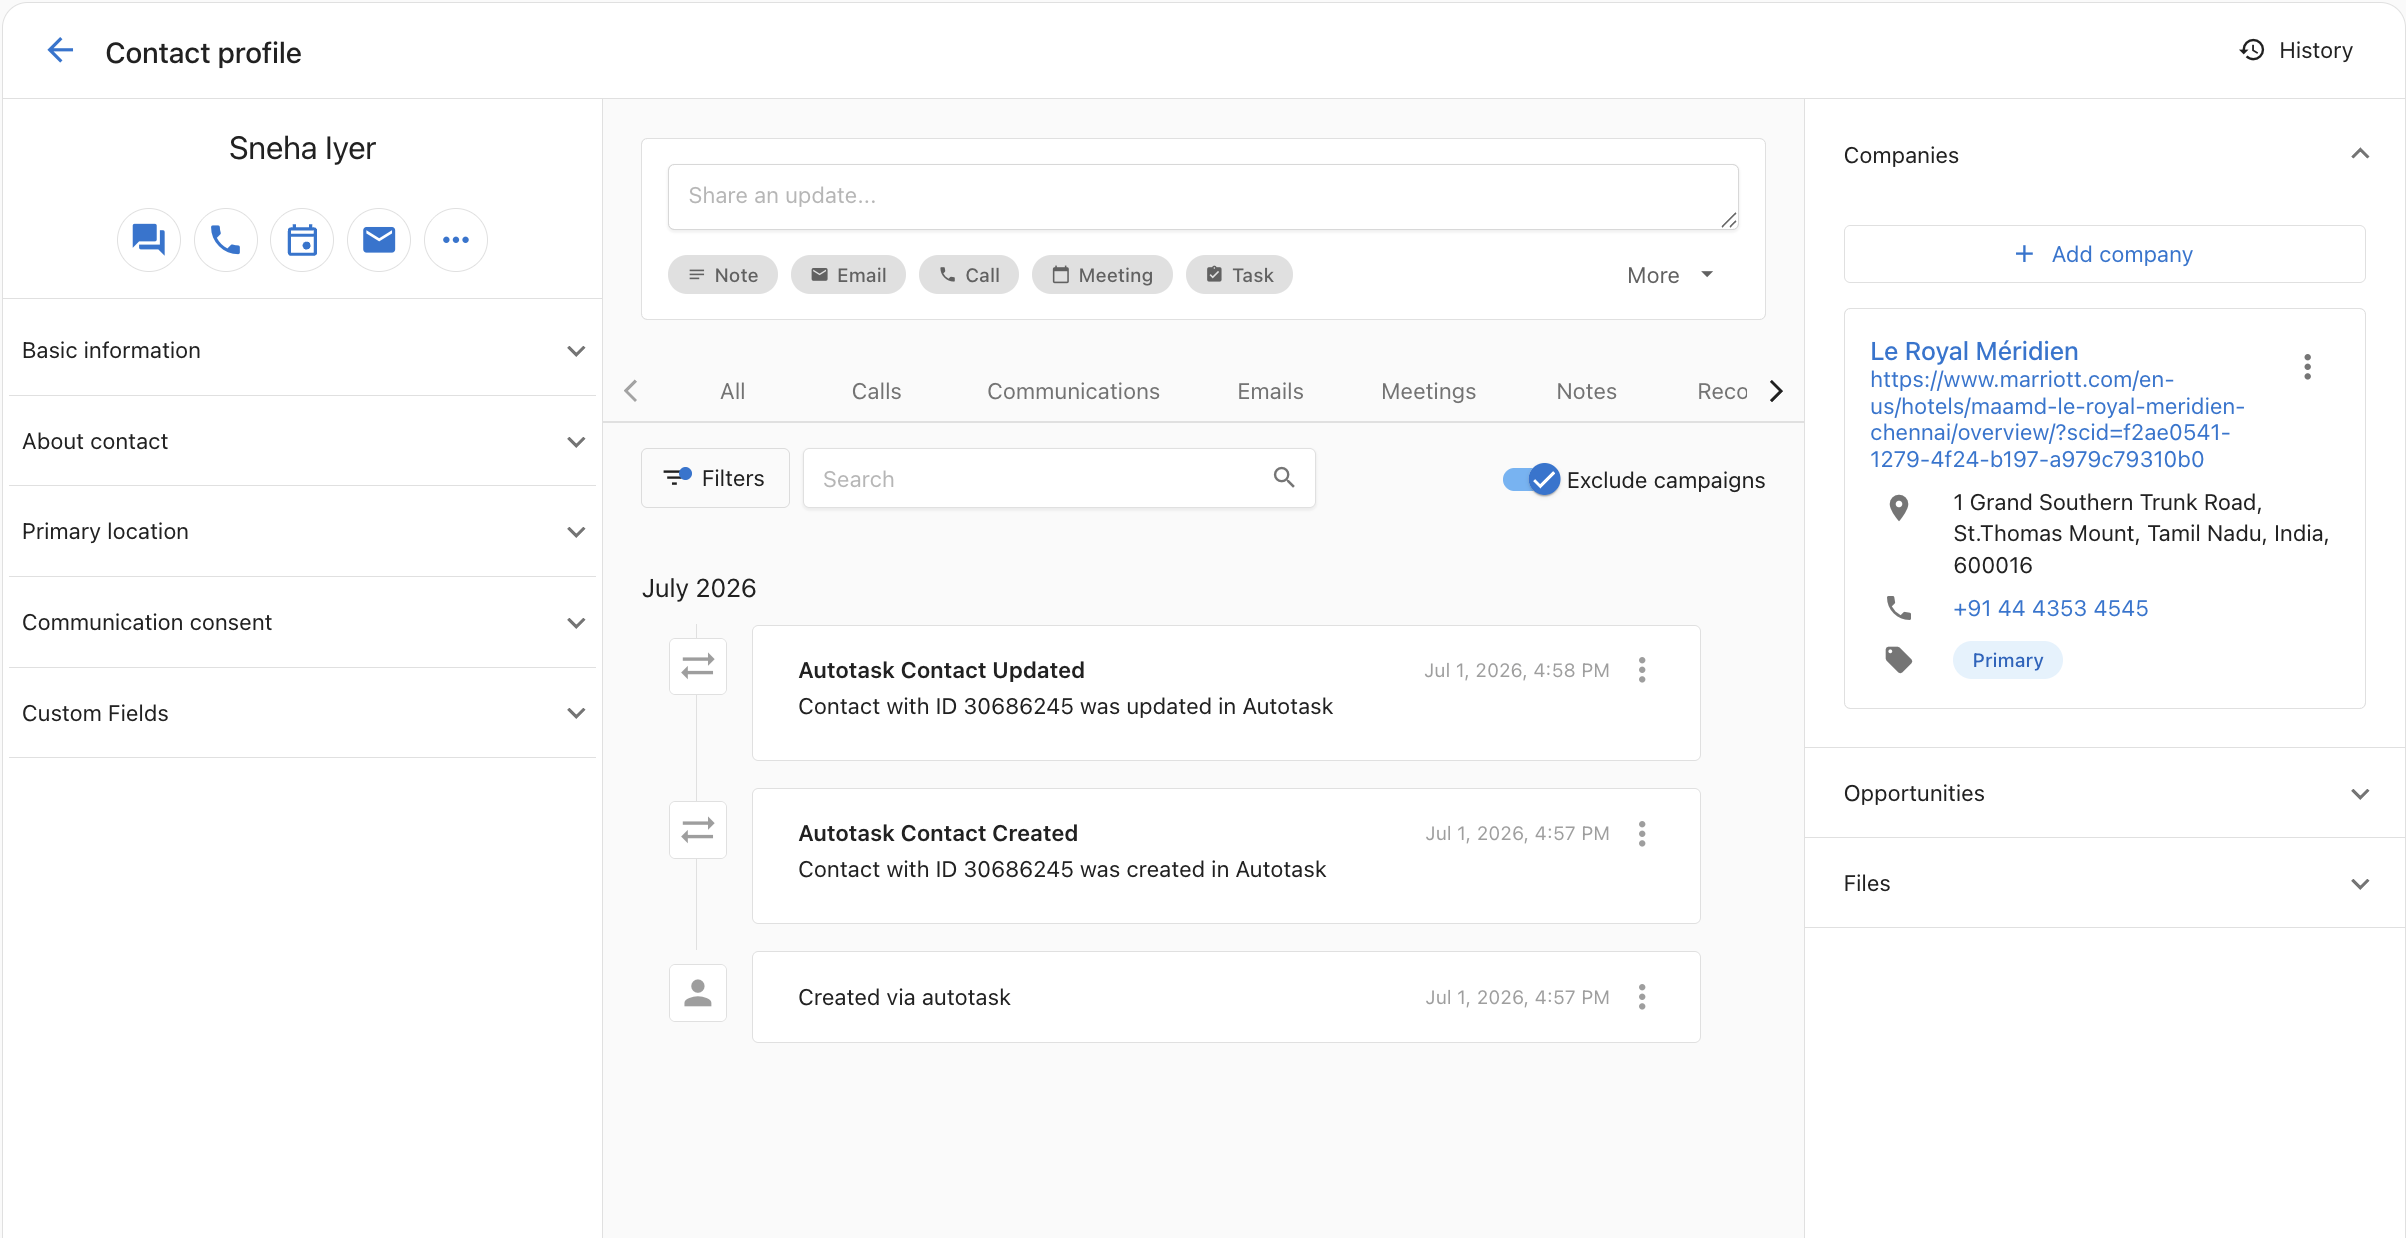
Here is a real-world example of the integration in action:
- A partner adds a new contact, "Sneha Iyer", under the company "Le Royal Meridien" on the Autotask side.
- Within seconds, Sneha Iyer appears in Vendasta CRM under Le Royal Meridien — with a sync note in the Activity Feed confirming the event.
- The team updates Sneha Iyer's phone number in Vendasta. With Sync back to Autotask selected, the updated phone number flows back to Autotask automatically.
How should I roll out the integration?
Roll the integration out gradually so you can confirm it behaves as expected before relying on it for every record:
- Start with one internal test company and one contact.
- Verify field mapping behavior and confirm the records appear as expected in both systems.
- Decide whether one-way or two-way sync best fits your team.
- Train administrators on where to update customer records going forward.
- Roll out to the broader team once the process is confirmed.
Troubleshooting
| What you see | What is happening | How to fix it |
|---|---|---|
| 500 error when connecting | API credentials are invalid or the user is disabled | Verify credentials in Autotask Admin. Re-enter. |
| "Credential validation failed: Integration Code is invalid." | The API user's Integration Vendor is not set to AMP - Automated Marketing Platform | In Autotask, open the API User → API Tracking Identifier → Integration Vendor → select AMP - Automated Marketing Platform, then reconnect. If the vendor cannot be changed on the existing user, create a new API user with that vendor selected. |
| "Connected" but nothing syncs | Webhooks are not enabled on the security level | Open the security level in Autotask → Other Settings → enable webhooks with limit of 5+ |
| Contacts not appearing | Contact is not linked to a company in Autotask | Link the contact to a company in Autotask. Unlinked contacts are skipped. |
| Duplicate records after connecting | Records existed in both systems without Autotask IDs | Disconnect. Clean up duplicates. Bulk import with external_id. Reconnect. See Recovery section. |
| "Broken" status on connection card | API credentials expired or revoked | Click Re-authenticate. Re-enter credentials. |
| Sync back to Autotask not working | The record is missing its Autotask ID | Check the record in Vendasta. If autotask-company-id or autotask-contact-id is empty, use bulk import to add external IDs. |
How do I recover if I already have duplicates?
If you connected Autotask before importing company and contact external IDs and now have duplicate records:
- Disconnect the Autotask integration from Integrations settings.
- Merge or delete duplicate records in Vendasta CRM.
- Prepare CSV files with Autotask IDs (follow the Bulk Import section above).
- Import companies first, then contacts — with external_id values.
- Reconnect the integration — sync will now match by external_id. No new duplicates.
Frequently asked questions
Can I still use Zapier with this integration?
You can, but we do not recommend it. Running both creates duplicate records. Disable your Autotask-related Zaps after connecting the native integration.
What happens if I disconnect?
Nothing is deleted. Records stay in both systems. Reconnecting later resumes sync from where it stopped.
Can I create a contact in Vendasta without associating it to a company?
Yes. Vendasta allows contacts to exist independently without a company association. However, standalone contacts will not sync to Autotask. Autotask enforces a mandatory company-contact relationship — every contact must belong to a company. If a contact exists in Vendasta without a company association, the integration will skip the sync and log an activity note indicating the contact was not synced.
How do I fix a contact that is not syncing to Autotask?
Associate the contact with a company in Vendasta. Once the company-contact relationship is established, the contact will be eligible for sync to Autotask on the next sync cycle.
Does this limitation apply to all integrations or only Autotask?
This is specific to Autotask. Each integration has its own data model requirements. Autotask strictly requires a company-contact hierarchy. Other integrations may handle standalone contacts differently depending on their own data model.
How fast does data sync?
Webhook-based — typically within seconds. If Autotask's API is slow, up to 1 minute.
Does deleting a record in Autotask delete it in Vendasta?
No. Deletes are non-destructive. An activity note is created. The record remains.
Can multiple users connect to the same Autotask account?
No. One connection per Vendasta account. The connection is account-level, not user-level.
What if I have contacts in Vendasta that are not in Autotask?
If they have matching email addresses, they will be matched during sync. If not, use the Bulk Import process to pre-populate Autotask IDs before connecting.
Is the data secure?
Yes. Direct API-to-API communication. Data encrypted in transit. No third-party intermediaries.
Why is my sync broken after a credential change?
Your API credentials may have expired. Check the integration card — if it shows "Broken" status, click Re-authenticate and re-enter your credentials.
Does the integration sync historical notes or all CRM activity?
No. The integration syncs company and contact records, and it logs sync events (creates, updates, safe deletes) to the Activity Feed as they happen. It does not retroactively import historical notes or mirror all past CRM activity from one system into the other.
How long does setup usually take?
Most partners can complete setup in 5 to 10 minutes if they already have Autotask administrator access and the required permissions in place. Add extra time for the bulk import step if you have existing records in both systems.