The Get started learning path sequences your first-week setup: the platform, branding, accounts, your team, and getting paid.
How do I set up my team in Partner Center?
To set up your team in Partner Center, go to Administration → My Team, invite each person as an Admin, Salesperson, or Digital Agent, and set their permissions. You can also edit members, resend welcome emails, and delete members from the same page.
Getting Started Checklist
- Understand the roles: learn what each role can access
- Invite your team members: add admins, salespeople, and digital agents
- Set permissions: control what each person can see and do
- Manage your team: edit profiles, reset passwords, and remove members
Step 1: What roles can team members have?
The platform has three main roles for your internal team. Each role has a different level of access and is designed for a different type of work.
| Role | Access | Best for |
|---|---|---|
| Admin | Full Partner Center access | Operations, managers, agency owners |
| Salesperson | CRM, opportunities, orders, Conversations | Client-facing sales team members |
| Digital Agent | Fulfillment only | Fulfillment staff who complete project tasks |
Most internal team members should be given at least some level of admin access. You can restrict admins from specific areas using permissions, so there is no need to default everyone to a salesperson role just to limit access.
All three roles are managed from the same place: Partner Center → Administration → My Team.
Your subscription determines how many seats are available. Check the banner at the top of the My Team page to see how many seats you have remaining. Adding members beyond your included seats may result in additional charges.
Step 2: How do I invite team members?
Invite an admin
Admins log in at partners.vendasta.com and can manage accounts, billing, the marketplace, and more depending on their permissions.
- Go to
Partner Center→Administration→ My Team. - Click Invite team member in the upper right corner.
- Enter the admin's first name, last name, and email address.
- Select the permissions you want to grant. (You can adjust these later.)
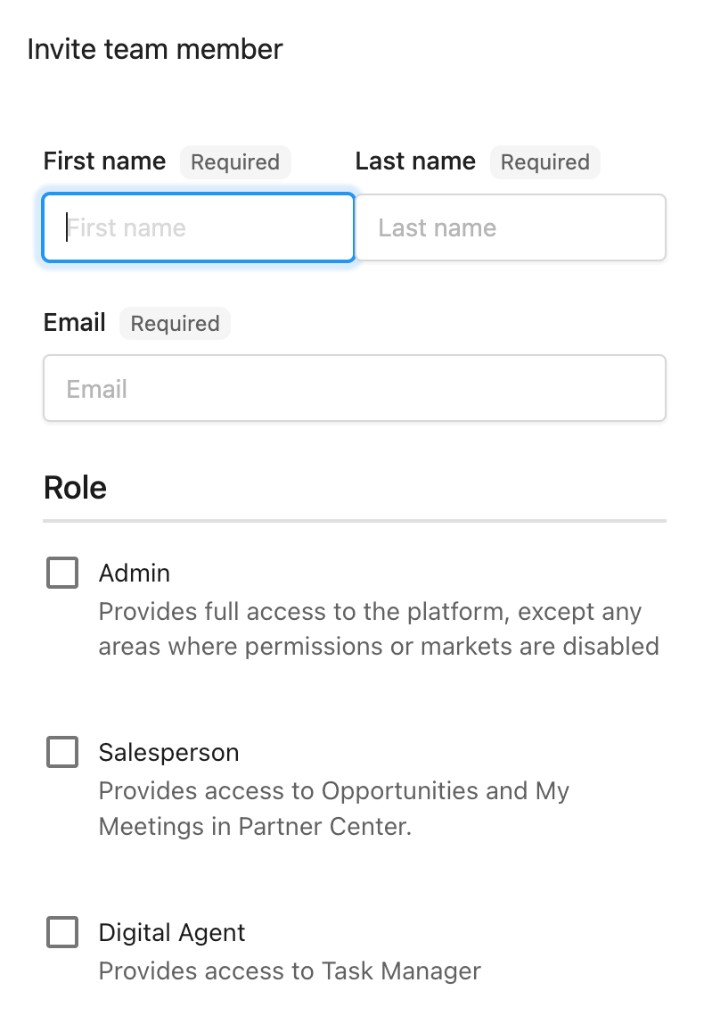
- Select which markets the admin should have access to.
- Click Send.
The new admin will receive a welcome email with a link to set their password and sign in.
If you do not see the Invite team member button, you do not have permission to create new admins. Contact another admin at your organization who has that permission.
Invite a salesperson
Salespeople have access to the CRM, opportunities, conversations, and orders. They do not have access to billing, the marketplace, or platform settings.
- Go to
Partner Center→Administration→My team. - Click Invite team member.
- Enter the salesperson's first name, last name, and email address.
- Under Role, select Salesperson.
- Select the market the salesperson should access.
- Ensure Send welcome email to the user is checked.
- Click Send.
Invite a digital agent
Digital Agents only access Fulfillment to work on fulfillment tasks and projects. They do not have access to Partner Center or Business App.
- Go to
Partner Center→Administration→My team. - Click Invite team member.
- Enter the digital agent's first name, last name, and email address.
- Under Role, select Digital Agent.
- Click Send.
Step 3: How do I set permissions?
For admins and salespeople, you can control exactly what they can see and do in the platform. Permissions are set per person, so you can tailor access for each team member.
- Go to
Partner Center→Administration→My team. - Click the menu icon (⋮) next to the team member's name.
- Click Edit member.
- If the team member is an admin, click Show more permissions to see the full list.
- Toggle individual permissions on or off.
- Click Save.
Key admin permissions
| Permission | What it controls |
|---|---|
| Can create and manage admins | Access to the My Team page to invite and manage team members |
| Can access Marketplace | Ability to discover products, manage the store, and see wholesale pricing |
| Can manage accounts and users | Access to the Accounts and Users sections under Businesses |
| Can manage retail billing | Access to invoices, subscriptions, payments, payouts, and tax rates |
| Access to company billing reports | Access to My Billing, financial documents, and reporting |
| Able to customize the platform | Access to branding, Business App customization, and platform settings |
| Can manage orders | Ability to approve, decline, and activate orders |
Key salesperson permissions
| Permission | What it controls |
|---|---|
| Can access Proposals | View and manage proposals |
| Can access Conversations | View and respond to conversations |
| Can manage Opportunities | Set to all opportunities or only their own |
| Can manage Orders | Set to all orders or only their own |
| Can access Pricing | View retail pricing and product details |
Step 4: How do I manage my team?
Edit a team member
- Go to
Partner Center→Administration→My team. - Click the menu icon (⋮) next to the team member's name.
- Click Edit member.
- Update their name, role, or permissions. You can't change a team member's email address.
- Click Save.
Reset a team member's password
You cannot set a password directly for another user, but you can resend their welcome email which includes a link to set or reset their password.
- Go to
Partner Center→Administration→My team. - Click the menu icon (⋮) next to the team member's name.
- Click Resend welcome email.
The team member will receive an email with a link to reset their password.
Delete a team member
Deleting a team member is permanent and cannot be undone. If a team member no longer needs admin access but should remain in the system, remove their admin role instead of deleting them entirely.
- Go to
Partner Center→Administration→My team. - Click the menu icon (⋮) next to the team member's name.
- Click Delete member.
Learn more about managing your team
Frequently asked questions
What access does a Digital Agent have?
Digital Agents only access Fulfillment to work on fulfillment tasks and projects. They do not have access to Partner Center or Business App.
Should I give team members the Admin or Salesperson role?
Most internal team members should be given at least some level of admin access. You can restrict admins from specific areas using permissions, so there is no need to default everyone to a salesperson role just to limit access.
Can I restrict what an admin can do?
Yes. Go to Partner Center → Administration → My team, click the menu icon (⋮) next to the team member's name, and click Edit member. Click Show more permissions, toggle individual permissions on or off, and click Save.
Can I change a team member's email address or role?
You can change their role, but not their email address. To change a role, go to Partner Center → Administration → My team, click the menu icon (⋮) next to the team member's name, click Edit member, update their role or permissions, then click Save. To use a different email, create a new team member with that email and delete the old one.
How do I help a team member set or reset their password?
You cannot set a password directly for another user. Go to Partner Center → Administration → My team, click the menu icon (⋮) next to the team member's name, and click Resend welcome email. The team member receives an email with a link to set or reset their password.
Why don't I see the Invite team member button?
If you do not see the Invite team member button, you do not have permission to create new admins. Contact another admin at your organization who has that permission.
How do I give a Digital Agent access to Partner Center?
The Digital Agent role only includes Fulfillment, so a Digital Agent can't sign in to Partner Center. To give them access, add the Admin role and keep Digital Agent so their Fulfillment access stays the same:
- Go to
Partner Center→Administration→My team. - Click the menu icon (⋮) next to the team member's name, then click Edit member.
- Select Admin, and keep Digital Agent selected.
- Check Send welcome email to the user. This option appears once you select Admin.
- Optionally, click Show more permissions to limit what they can access.
- Click Save. If a warning about automations appears, review it before saving.
The team member receives a welcome email with a link to set their password and sign in to Partner Center.