The Get started learning path sequences your first-week setup: the platform, branding, accounts, your team, and getting paid.
Subscriptions & client billing
In Partner Center, activating a product for a client creates a subscription that tracks the recurring service. To bill clients, turn on Subscriptions in your default or account-level billing settings, then send or automatically charge invoices from Commerce → Invoices.
Subscriptions determine when invoices are generated, how much clients are charged, and how you collect payment. This guide walks you through how subscriptions work, how to configure billing for your clients, and how to manage invoices over time.
Getting Started Checklist
- Understand how subscriptions work: learn the difference between wholesale and retail subscriptions
- Configure your billing settings: set default billing rules and customize them per client
- Send and manage invoices: create, send, and track invoices for your clients
- Apply discounts and tax rates (optional): add discounts and configure tax for professional invoicing
Step 1: How do subscriptions work?
Every time you activate a product for a client account, Vendasta creates two subscriptions automatically:
- Wholesale subscription: what you pay Vendasta for the product
- Retail subscription: what you charge your client for the product
As a partner, you primarily work with retail subscriptions. These control what your client is billed and when. You can view, edit, and cancel retail subscriptions from the client's account page.
Where to find subscriptions
Navigate to Partner Center → Accounts → Manage Accounts, open a client account, and click the Subscriptions tab. You'll see all active retail subscriptions for that account, along with their prices, renewal dates, and billing status.
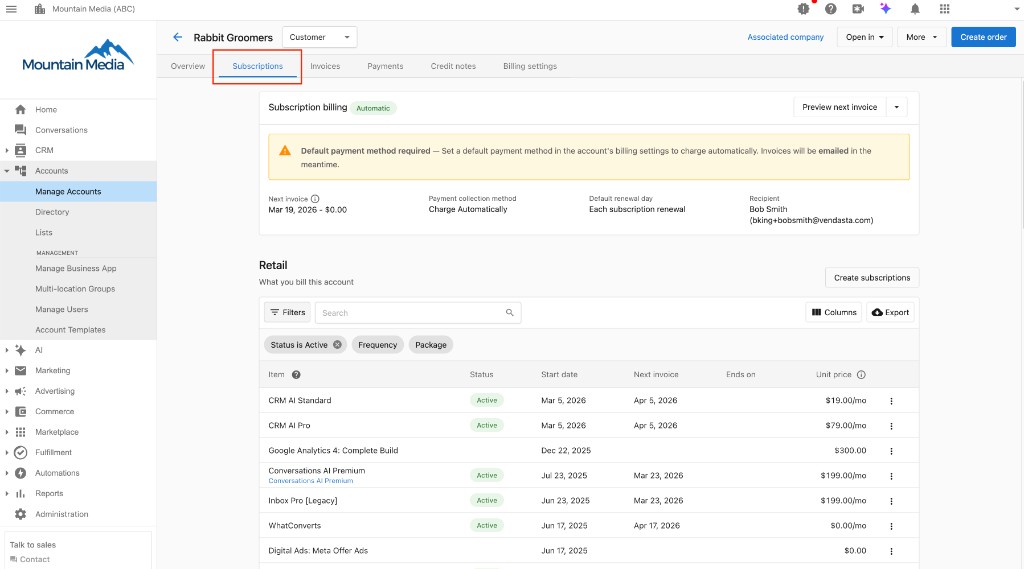
Activating a product creates a subscription to track the service, but it does not automatically charge your client. Billing only occurs when you have subscription billing configured and turned on. See Step 2 below to set this up.
Subscription renewal and invoicing
Subscriptions renew on a set date (monthly, yearly, or one time, depending on the product). When a renewal occurs, the platform generates an invoice for your client based on the billing settings you've configured. Subscriptions that share the same renewal date are consolidated into a single invoice.
Learn more about subscriptions
Step 2: How do I configure billing settings?
You can configure billing at two levels: default settings that apply to all new accounts, and account-level settings that override the defaults for individual clients.
Set your default billing settings
Default billing settings are applied automatically to every new account you create, saving you from configuring each one manually.
Navigate to Administration → Default billing settings.
- Select a market from the dropdown at the top of the page. Settings are configured per market and will only apply to new accounts in that market.
- Turn the Subscriptions toggle On.
- Under Subscription scheduling, choose when subscriptions renew:
- Use subscription start date: each subscription renews based on when it was originally created.
- Use a specific renewal date: all new subscriptions renew on the same day of each month.
- Set the Payment collection method to Automatic or Manual.
- Under Subscription renewal, choose how invoices are handled:
- With Manual collection: Choose Do nothing (subscriptions will not charge accounts or create invoices) or Create a draft invoice (invoice is not sent to the customer; use if collecting payment manually). If you select Create a draft invoice, set the Invoice due date (e.g., within 7 days).
- With Automatic collection: The invoice is automatically charged to the payment method on file. If no payment method is on file, the invoice is emailed instead.
- Optionally, add a Memo to appear at the bottom of every subscription invoice.
- Click Save.
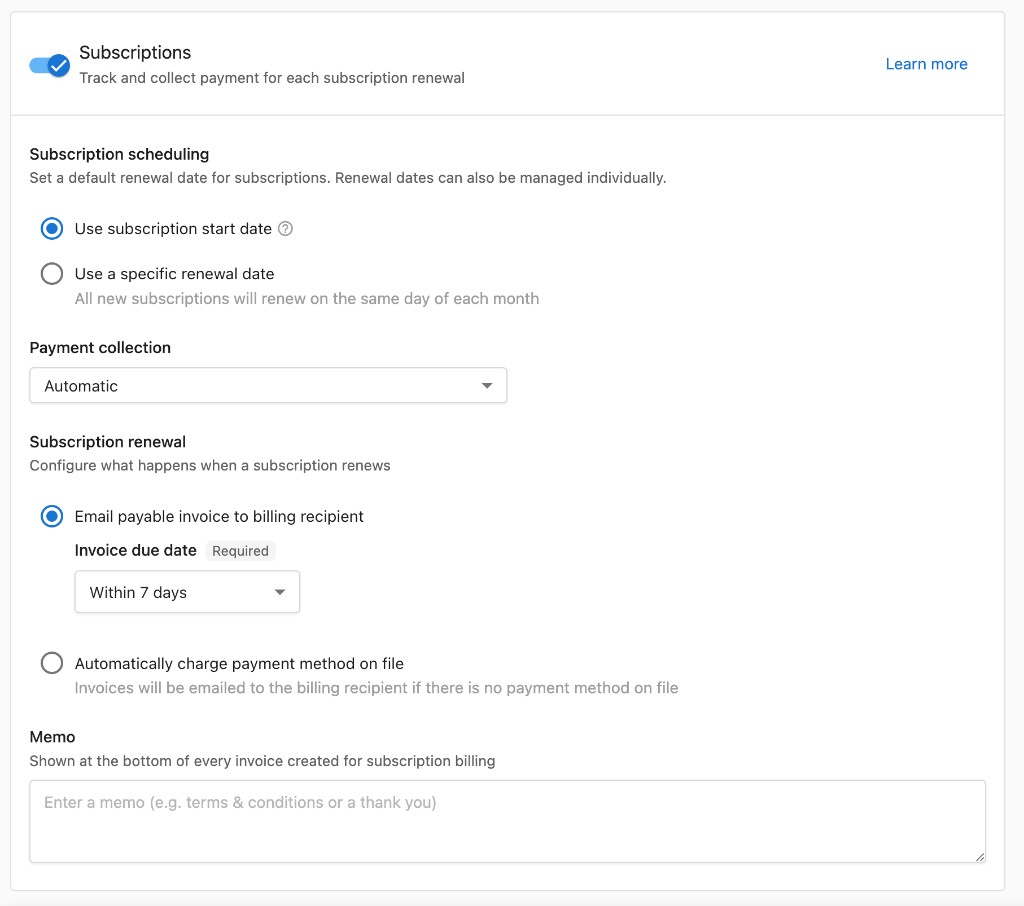
Default settings apply only to accounts created after you save. Existing accounts keep their current billing configuration. To update an existing account, use the account-level settings below.
Configure billing for an individual client
To override the defaults for a specific client:
- Open the client account in Manage Accounts.
- Click the Billing settings tab.
- Turn the Subscriptions toggle On.
- Configure Subscription scheduling, Payment collection, and Subscription renewal options, just as you would in default settings.
- On the right side, set the Billing recipient and configure Payment methods for the account.
- Optionally add a Memo that will appear on every invoice sent to this client.
- Click Save.
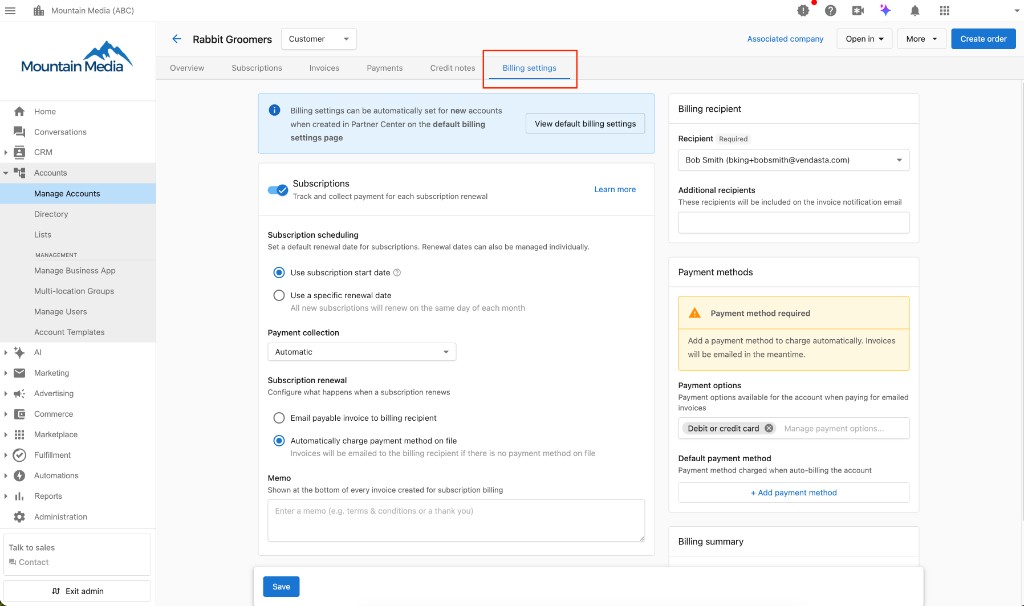
Use Use a specific renewal date under Subscription scheduling to consolidate all of a client's renewals into one invoice per month, regardless of when individual products were activated.
Learn more about default billing settings
Step 3: How do I send and manage invoices?
Invoices are how you formally request and collect payment from your clients. They can be generated automatically from subscription renewals, or created manually for one-off charges.
Navigate to Partner Center → Commerce → Invoices.
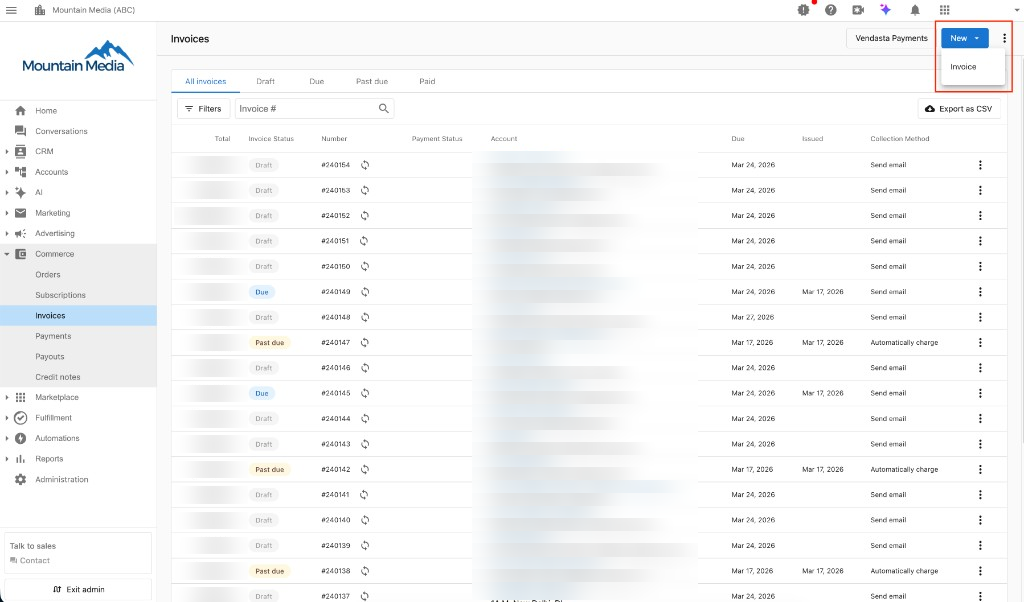
Create an invoice manually
- Click
New→Invoiceand select the client account. This immediately creates and saves a draft invoice. - Set the Recipient (required) and optionally add Additional recipients.
- Set an Issue date and a Due date.
- Click
Add itemto add products from your Marketplace, orAdd custom itemto enter a custom line item. - Optionally, add a Memo to include additional context such as terms, conditions, or a thank-you note.
- Review the subtotal and total, then click
Send invoiceto email it to the recipient.
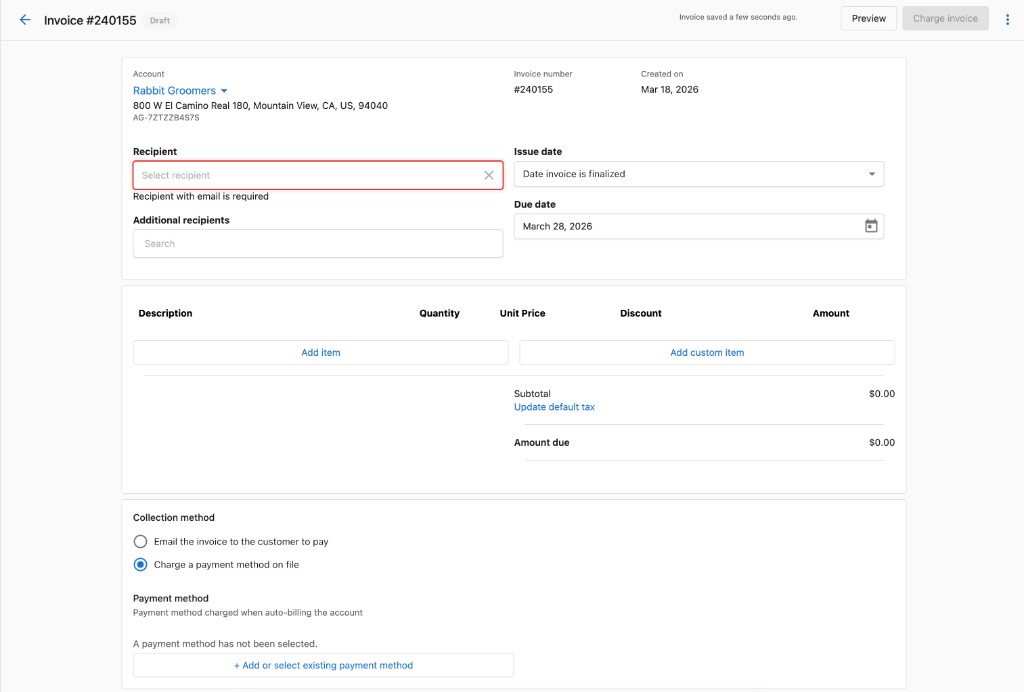
Draft invoices can be edited as many times as needed before sending. Once sent, an invoice cannot be edited. If you need to correct a sent invoice, void it and create a new one.
Invoice statuses
| Status | Meaning |
|---|---|
| Draft | Created but not yet sent; can still be edited |
| Due | Sent to the client; no longer editable |
| Past due | Payment is overdue |
| Paid | Payment has been collected |
| Void | Cancelled; no longer actionable |
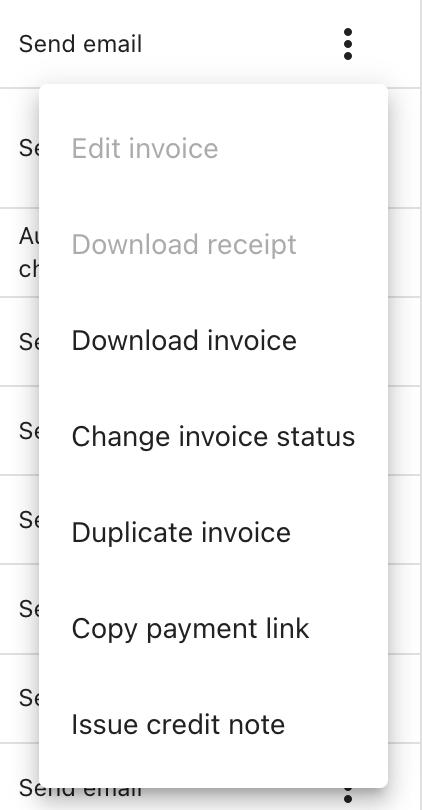
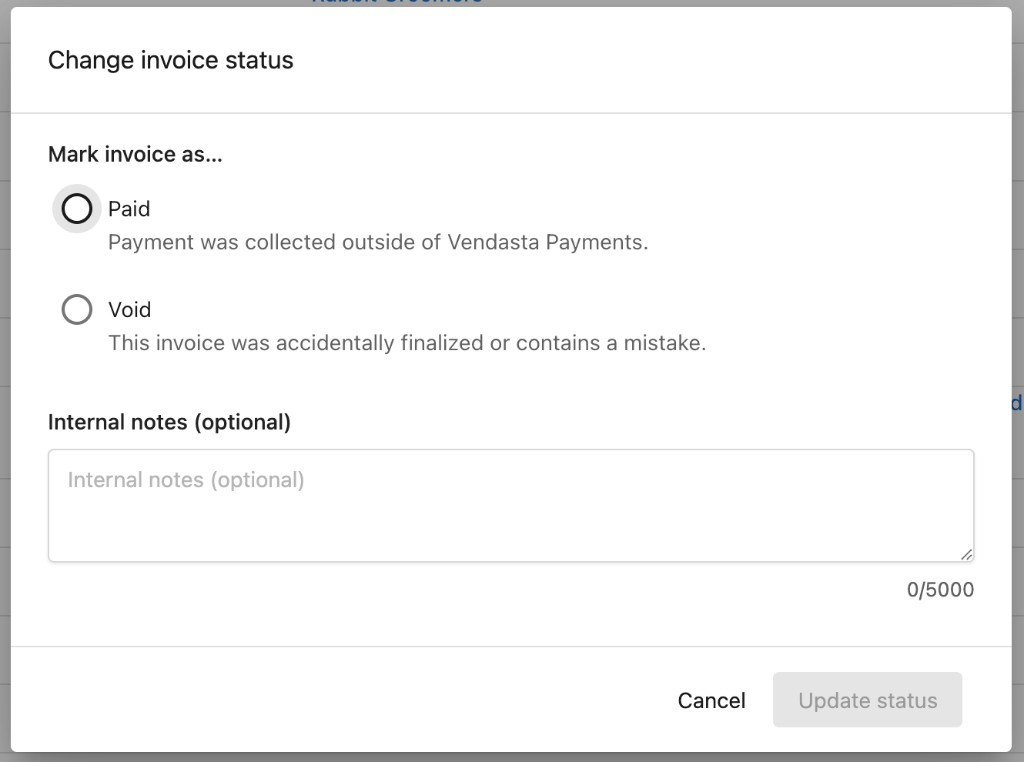
To mark an invoice as paid manually: go to Commerce → Invoices, click the options menu (⋮) on the invoice, and select Mark as paid.
Step 4: (Optional) How do I apply discounts and tax rates?
Apply a discount
You can apply a discount to a one-off invoice or to a recurring subscription:
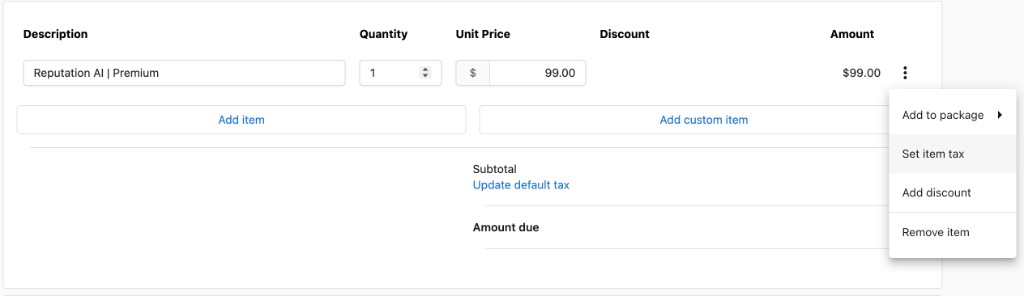
- Invoice discount: On an invoice line item, click the options menu (⋮) and select
Add discount. Choose a percentage or fixed amount. This applies to that line item only.
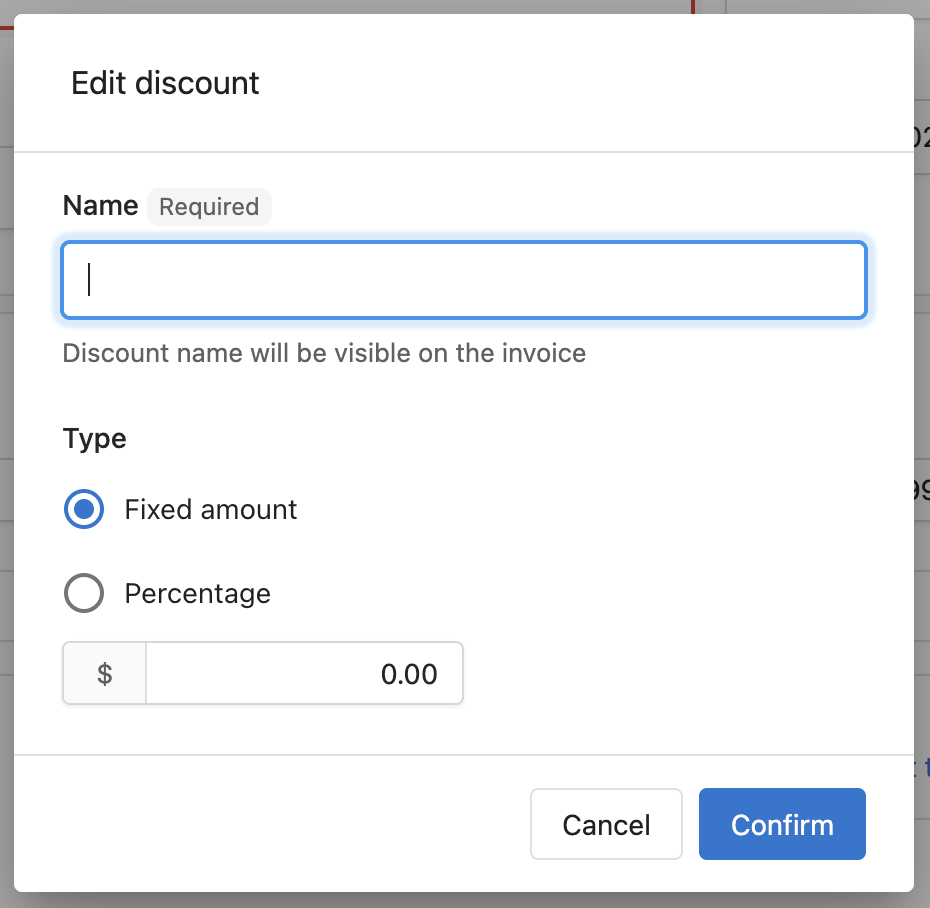
- Subscription discount: open the subscription, click Discount, set the type and value, and choose how long it applies (ongoing, a limited time, or once). This carries forward to future invoices generated from that subscription.
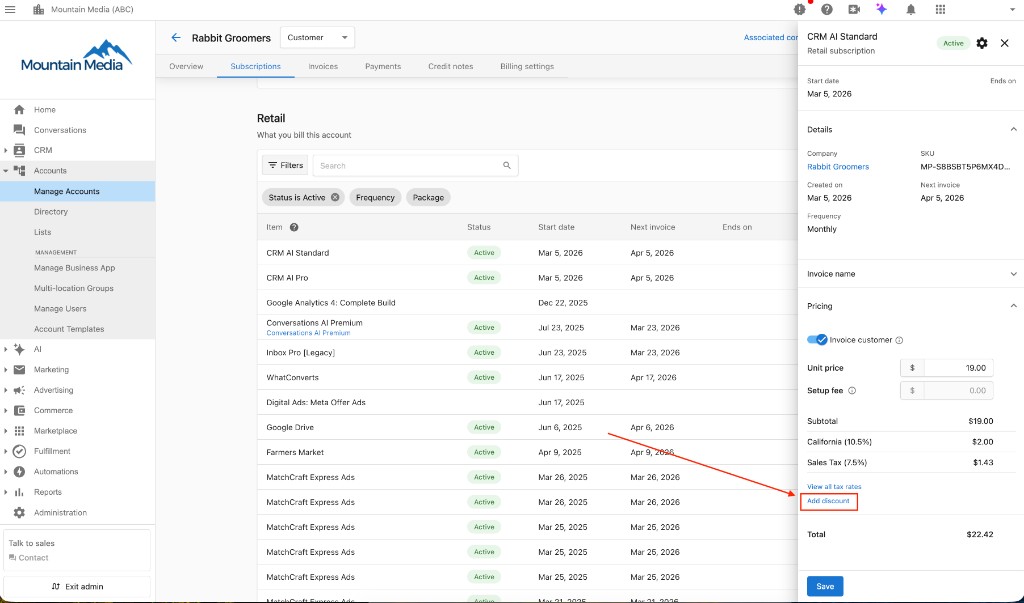
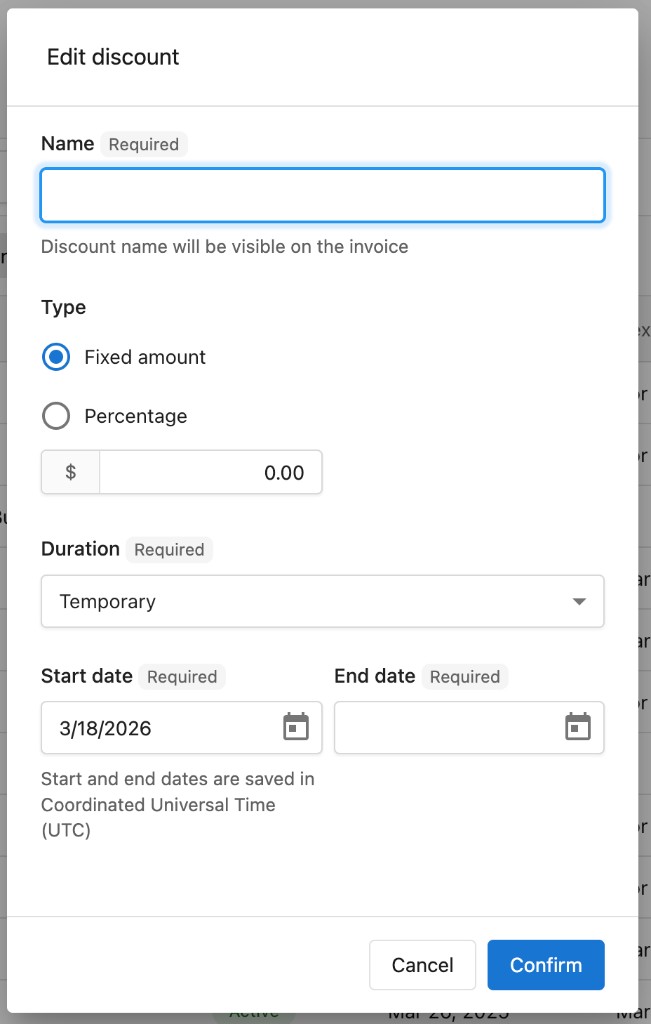
Only one discount can be applied per invoice line item.
Set up tax rates
If you need to charge tax on your invoices, create tax rates first in Administration → Tax rates.
- Click
Create tax rate. - Select a Country and optionally a State/Prov.
- Enter a Tax name and the Rate (%).
- Optionally add a Description/Tax number and an Accounting code.
- Click Save.
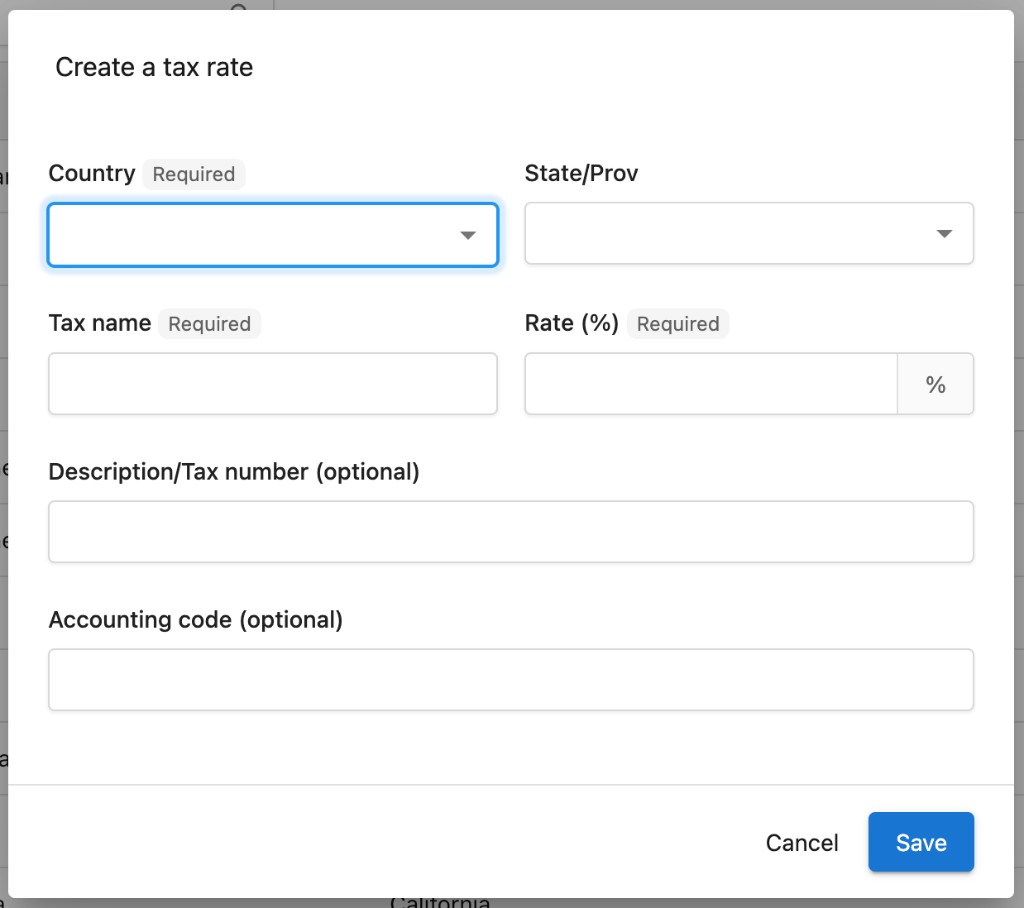
Once created, tax rates can be applied to individual line items on any invoice. Open the invoice, click the options menu (⋮) on a line item, and select Set item tax.
Learn more about discounts and tax rates
Frequently asked questions
Does activating a product automatically charge my client?
No. Activating a product creates a subscription to track the service, but billing only occurs when you have subscription billing configured and turned on in the default or account-level billing settings.
Where do I set up billing for my clients?
Set defaults for new accounts at Administration → Default billing settings. Remember to select a market first, as settings are configured per market. To override the defaults for one client, open the account in Manage Accounts and use the Billing settings tab.
What happens if I choose to automatically charge the payment method on file and the client has no payment method?
If no payment method is on file, the invoice is emailed to the billing recipient instead.
How do I combine a client's renewals into one invoice each month?
Under Subscription scheduling, select Use a specific renewal date. All of that client's subscriptions then renew on the same day of each month, and subscriptions that share a renewal date are consolidated into a single invoice.
Can I edit an invoice after I send it?
No. Draft invoices can be edited as many times as needed, but a sent invoice can't be edited. To correct a sent invoice, void it and create a new one.