How do I set up and manage Google Workspace for my clients?
To set up Google Workspace for a client, open the account in Accounts → Manage Accounts in Partner Center and click Create Order → Add Google Workspace. To move an existing subscription to Vendasta, use Add Google Workspace Transfer with the client's transfer token. This guide covers setup, transfers in and out of Vendasta, and SSO.
What is the Google Workspace integration?
Google Workspace integration with the Vendasta platform provides productivity solutions for your clients while maintaining centralized management through Partner Center. This integration supports both new Google Workspace setups and transfers of existing subscriptions.
Key integration benefits
- Centralized billing and management through Partner Center
- Seamless user authentication with Business App
- Automated provisioning and deprovisioning
- Comprehensive administrative control
- Support for both SSO and direct Google login
Pre-setup requirements
Before beginning any Google Workspace configuration, ensure you have the following prerequisites:
Essential requirements
- Domain administrative access - Full DNS management capabilities for the target domain
- Secondary email address - Alternative email on different domain for administrative purposes
- Business App user setup - Configured users matching the Google Workspace domain structure
Domain configuration
- Verify domain ownership and administrative rights
- Ensure DNS settings can be modified (TXT and MX records)
- Plan domain structure for all Google Workspace users
- Example format:
username@clientdomain.com
User planning
- Identify all users who will need Google Workspace access
- Plan user roles and permissions structure
- Determine administrative responsibilities
- Consider future scaling requirements
New Google Workspace setup
Business App user configuration
Creating new users
- In
Partner Center, openAccounts→Manage Accounts→[Account Name]and clickInvite users. The Invite users panel opens with the account preselected. - Type each user's email address, ensuring the email domain matches the Google Workspace domain. Matching CRM contacts are suggested as you type.
- Click
Invite [count] users. Each invited user receives the onboarding email.
Alternatively, create users centrally from Accounts → Manage Users → Create user, then add them to the target account: select the edit icon → Edit Permissions → Add Account, locate the account, select its checkbox, and click Add Accounts.
Using existing users
If users already exist with matching domain, invite them from the account's Invite users panel by typing their email, or manage their account access directly:
- Navigate to
Partner Center→Accounts→Manage Users - Select the edit icon next to the target user →
Edit Permissions - Click
Add Account - Locate target account and select checkbox
- Click
Add Accounts - Repeat for all applicable users
Skip to activation if users are already assigned to the target account.
Google Workspace activation
Initial activation process
- Navigate to
Partner Center→Accounts→Manage Accounts - Select target account
- Click
Create Order→Add Google Workspace - Click
Continue - Check both
I understand...acknowledgment boxes
Setup scenarios
Choose the scenario that best matches your deployment strategy:
Scenario A: client-managed setup
Use case: Client handles all Google Workspace configuration independently
Configuration:
Domain name: Client's domain for Google WorkspaceUsername: Client's primary email address (must match domain)Business App user: Select corresponding Business App userAdmin email address: Client's alternative email (different domain required)
Process flow
- Client receives Welcome to Google Workspace email
- Client completes domain verification and DNS configuration
- Client configures Google Workspace settings independently
- Partner maintains billing and administrative oversight
Scenario B: partner setup, client administration
Use case: Partner performs initial setup, client takes over administration
Configuration:
Domain name: Client's domain for Google WorkspaceUsername: Client's primary email address (must match domain)Business App user: Select corresponding Business App userAdmin email address: Client's alternative email (different domain required)
Process flow:
- Partner completes initial activation and domain verification
- Client receives administrative credentials
- Client assumes ongoing administrative responsibilities
- Partner maintains billing relationship
Scenario C: partner setup and administration
Use case: Partner maintains ongoing administrative control
Configuration:
Domain name: Client's domain for Google WorkspaceUsername: Partner's email address on client domainBusiness App user: Select corresponding Business App userAdmin email address: Alternative email for password recovery
Process flow:
- Partner maintains full administrative control
- Partner handles all configuration and management tasks
- Client users access through Business App integration
- Partner provides ongoing support and management
Activation completion
- Complete configuration form based on chosen scenario
- Check
I understand...acknowledgment checkbox - Click
Purchaseto begin activation - Allow up to 10 minutes for product activation
Administrative configuration (for partner-managed setups)
Terms of Service acceptance:
- Monitor admin email inbox for "Google Workspace Admin User for..." message
- Click
Reset Passwordin the email - Enter secure password in
New PasswordandConfirm Passwordfields - Click
Resetto complete password setup - Navigate to https://admin.google.com
- Sign in with configured email and password
- Accept Google Workspace Terms of Service
Domain verification and DNS configuration
Final setup steps:
- Navigate to
Partner Center→Accounts→Manage Accounts→[Account Name] - Click
Google Workspace - Select
Setupfrom sidebar - Follow verification instructions:
- Recommended method: Automated verification process
- Alternate methods: Manual DNS configuration
DNS record configuration:
- TXT records: Domain ownership verification
- MX records: Email routing configuration
- Host-specific instructions: Use
View full instructionsfor platform-specific guidance - Support: Contact domain host for configuration assistance if needed
Additional user provisioning
Adding extra seats:
- Navigate to
Partner Center→Accounts→Manage Accounts→[Account Name] - Click
Google Workspaceunder Products section - Locate "Seat Available For Use" rows
- Click
Create Userfor each available seat
User configuration:
Business App user: Select matching Business App userFirst name and last name: User's full nameGoogle Workspace username: Username matching Business App userAlternate email: Recovery email on different domain
Repeat for all additional purchased seats.
Transferring existing Google Workspace subscriptions
Transfer overview
Google doesn't allow transfers to a reseller that hosted the same Google Workspace within the last 18 months. Verify the client's previous hosting history before initiating a transfer.
Transfer vs. new subscription differences:
- Transferred accounts do NOT require Business App login
- Users continue existing Google Workspace login patterns
- No disruption to existing workflows and data
- Billing transfers to Vendasta while maintaining user experience
Client transfer steps
Required client actions:
- Provide client with Vendasta's Reseller ID:
C02e5br85 - Have your client browse to admin.google.com/TransferToken. (If you land on a 404 page after clicking the above link, try opening the link in your browser's private/incognito browsing tab.)
- Have them click
Generate Transfer Token. Please note a token will be generated on Google's backend. This token will not be visible to the client.
Partner transfer processing
Partner Center configuration:
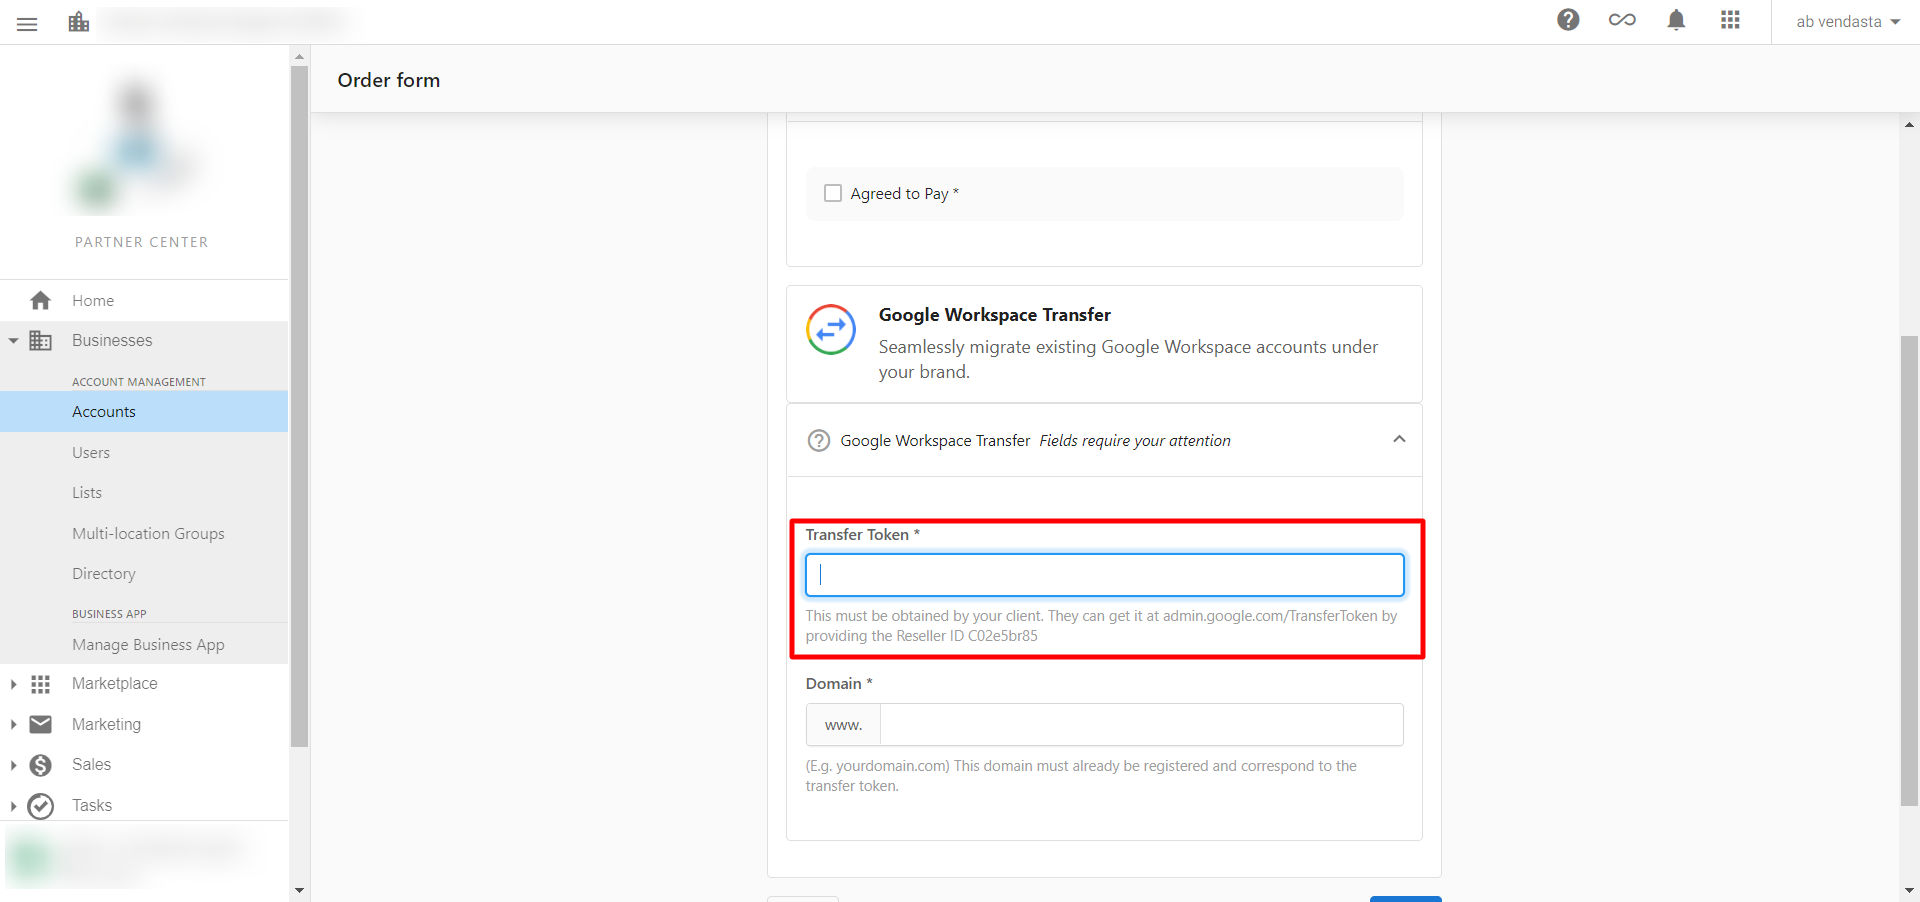
- Navigate to
Partner Center→Accounts→Manage Accounts→[Account Name] - Click
Create Order→Add Google Workspace Transfer - Enter client-provided
Transfer Token - Check
I understand...acknowledgment - Click
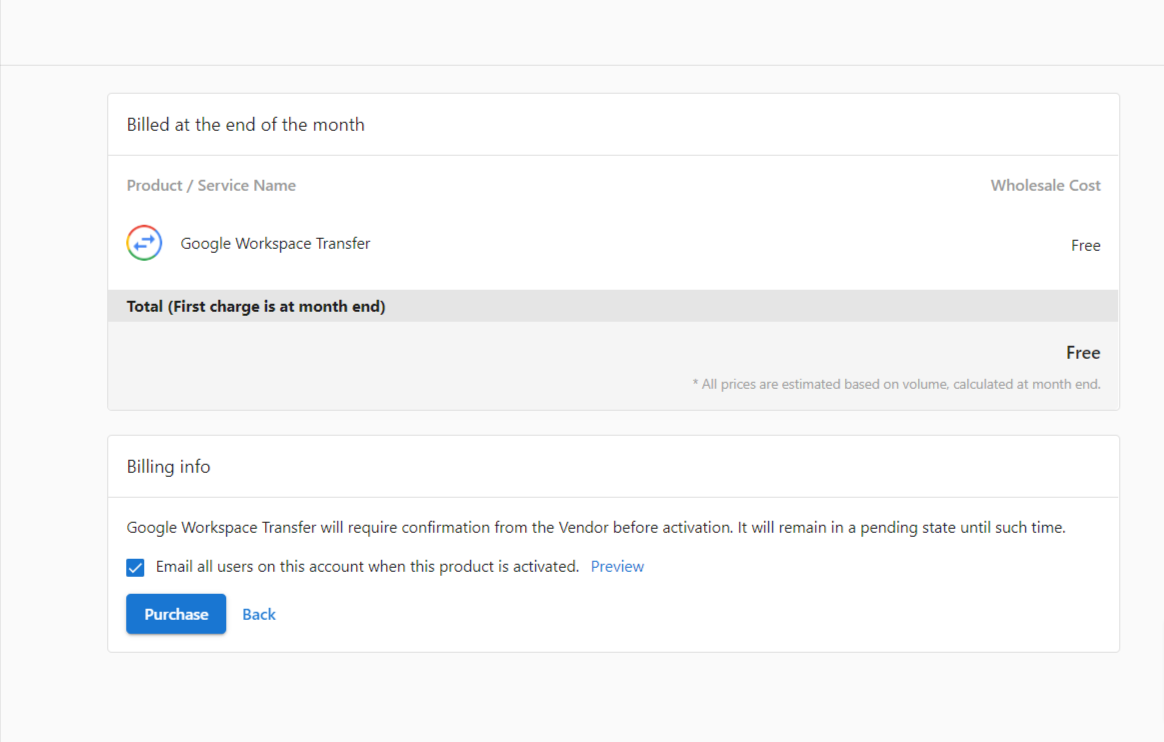
Purchase
Transfer completion:
- Review seat calculation (transfer is free, no billing for activation)
- Click
Google Workspace Transferunder the Products section - Confirm transfer details:
- Review seat count being transferred
- Check
I understand...acknowledgment - Click
Confirm Transfer
- Allow several minutes for processing and seat activation
- Verify client agreement to Google Workspace terms and conditions
Transferring Google Workspace out of Vendasta
You can transfer Google Workspace account(s) out of the Vendasta platform by cancelling the product.
What happens after cancellation?
- The client's Google Workspace emails and data remain intact.
- The account simply stops being managed by Vendasta and transfers back to Google.
- The Google Workspace admin will receive an email prompting them to access the Google Admin Console and set up billing directly with Google.
To avoid any service interruption, the client must set up payment with Google within 7 days of cancelling the product. This process is not automatic or managed by Vendasta.
Cancelling individual seats
If you are cancelling specific seat(s) rather than the full product, please also contact support@vendasta.com, as backend adjustments may be required to complete the process.
SSO management and configuration
Understanding SSO integration
Single Sign-On (SSO) integration allows users to access Google Workspace through Business App credentials, providing centralized authentication and seamless user experience across all platform products.
Disabling SSO for direct Google access
Use case: Users prefer direct Google login instead of Business App authentication
SSO disable process:
- Navigate to
Partner Center - Open account with active Google Workspace
- Access Google Workspace from Partner Center
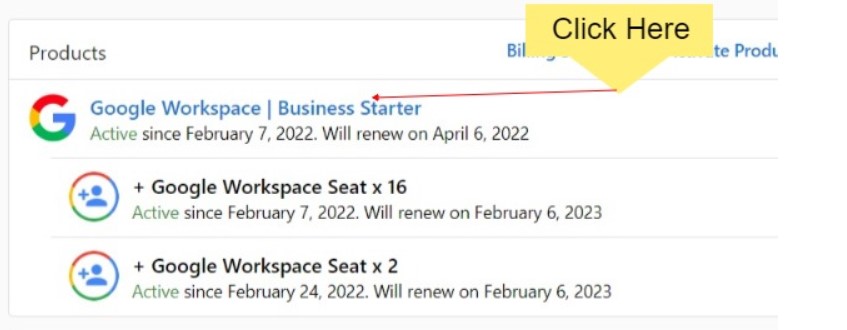
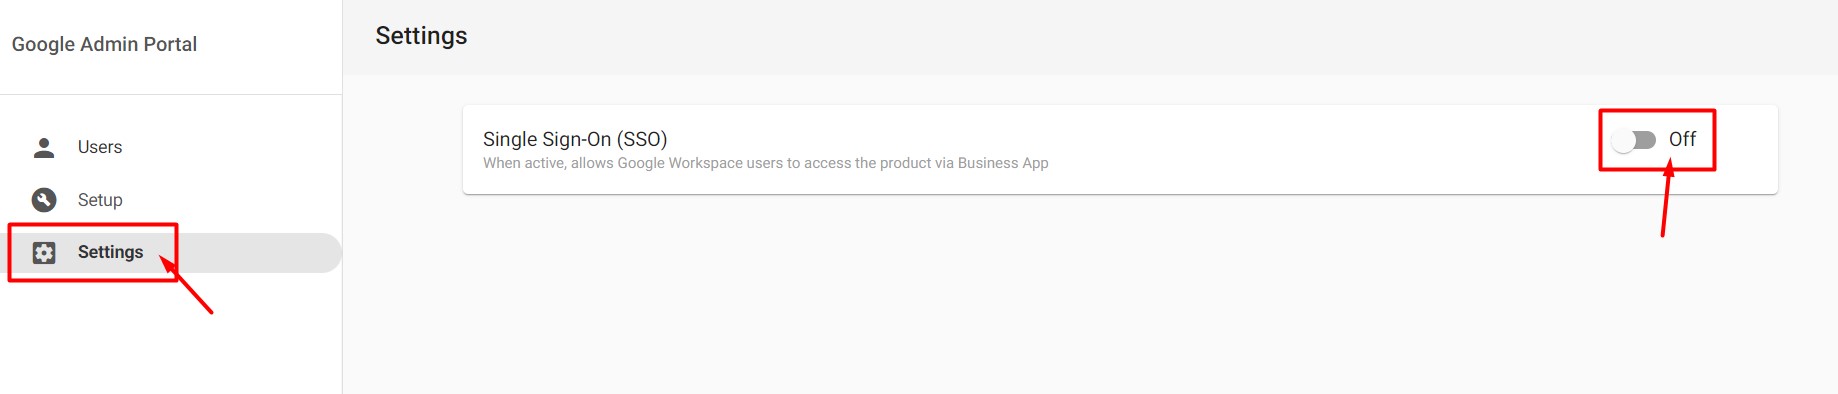
- Open Workspace dashboard
- Select
Settingsfrom left panel - Locate SSO (Single Sign-On) toggle
- Toggle SSO on or off as needed
Impact of disabling SSO:
- Users can access Google products directly through Google login
- Business App and Google Workspace become separate login experiences
- Reduced integration between platforms
- Users maintain separate authentication for each system
SSO best practices
When to keep SSO enabled:
- Centralized user management desired
- Single authentication point preferred
- Integration with other Business App products
- Simplified user training and support
When to disable SSO:
- Users prefer native Google experience
- Existing Google workflow dependencies
- Reduced complexity for end users
- Independent Google and Business App usage
Advanced management and troubleshooting
User management best practices
User provisioning strategy:
- Plan user hierarchy and permissions before setup
- Maintain consistent naming conventions
- Document user roles and responsibilities
- Regular review and cleanup of unused accounts
Access control management:
- Configure appropriate user permissions
- Implement security policies and requirements
- Monitor user access patterns and usage
- Regular security audits and updates
Integration monitoring
Performance monitoring:
- Regular connectivity testing between systems
- Monitor authentication success rates
- Track user adoption and usage patterns
- Identify and resolve integration issues quickly
Billing and account management:
- Regular review of seat utilization
- Monitor for billing discrepancies
- Plan for user growth and scaling
- Maintain accurate user count for billing
Common issues and solutions
Domain verification problems:
- Verify DNS record propagation (can take 24-48 hours)
- Confirm correct TXT and MX record values
- Check for conflicting DNS records
- Contact domain host for configuration assistance
User authentication issues:
- Verify Business App user configuration matches Google Workspace
- Confirm user permissions and account assignments
- Check SSO configuration settings
- Test authentication flow with sample users
Transfer problems:
- Verify transfer token generation and validity
- Confirm client's previous hosting history (18-month restriction)
- Check domain ownership and administrative access
- Ensure all prerequisite steps completed
Support and resources
Escalation paths:
- Billing questions: Account management team
- Google-specific issues: Google Workspace support
- DNS/domain issues: Domain registrar support
Setup walkthrough video
For visual guidance through the setup process, watch this walkthrough:
Frequently asked questions
What is Vendasta's reseller ID for a Google Workspace transfer?
Give your client Vendasta's Reseller ID, C02e5br85. The client then generates a transfer token at admin.google.com/TransferToken.
How do I move a client's Google Workspace out of Vendasta?
Cancel the Google Workspace product. The client's emails and data stay intact, and their Google Workspace admin gets an email to set up billing directly with Google, which they must do within 7 days to avoid interruption.
How do I cancel one Google Workspace seat instead of all of them?
Cancel the seat and also contact support@vendasta.com, since removing individual seats may need backend adjustments.
Why can't I transfer a client's Google Workspace to Vendasta?
Google blocks transfers to a reseller that hosted the same Google Workspace in the last 18 months. Also confirm the transfer token is valid and that the client has admin access to the domain.